Snowflake DCM Projects
Snowflake DCM Projects (Database Change Management Projects) is like giving a blueprint to Snowflake on how the objects should look and leaving the rest to Snowflake. Snowflake follows the blueprint and creates all the necessary objects. In layman’s terms, it’s like Automatic Tesla Car vs Manual Car, for a Tesla you’ll just have to instruct where to go and it’ll take you there, meanwhile a Manual car would be you carefully shifting the gears and pressing accelerators at the right time. Of course both are cool, but in terms of scalable projects where you’ve multiple tenants to maintain, it’ll be a pain to manually add one object after the other.
What you’ll Build by the End
In this blog I’m trying to build a multi-env (Dev and Prod) Salesforce data platform with deployments, because why not?
What is DCM Projects?
Instead of treating Snowflake objects as objects that change with ad-hoc DDL, we’re treating them as code.
wdym treating it as code?
So we’ll define how the databases, tables, functions, basically any (supported) objects should look like in a file (we can call it a blueprint) and Snowflake will make sure all the objects look like how it’s defined in the blueprint. This will enable version-controlled (lord git), repeatable environments, such as Dev, Prod and, if you’re not a risk taker even environments like QA, where you can plan and then deploy as a workflow.
If your definitions are repetitive you can parameterize your code by using Jinja templating, including dictionaries, loops, conditions, and macros. For example, you want audit columns in all the tables (like any sane person would), then instead of defining them in every table you can just use a Jinja macro and oh, this is just the tip of the iceberg!
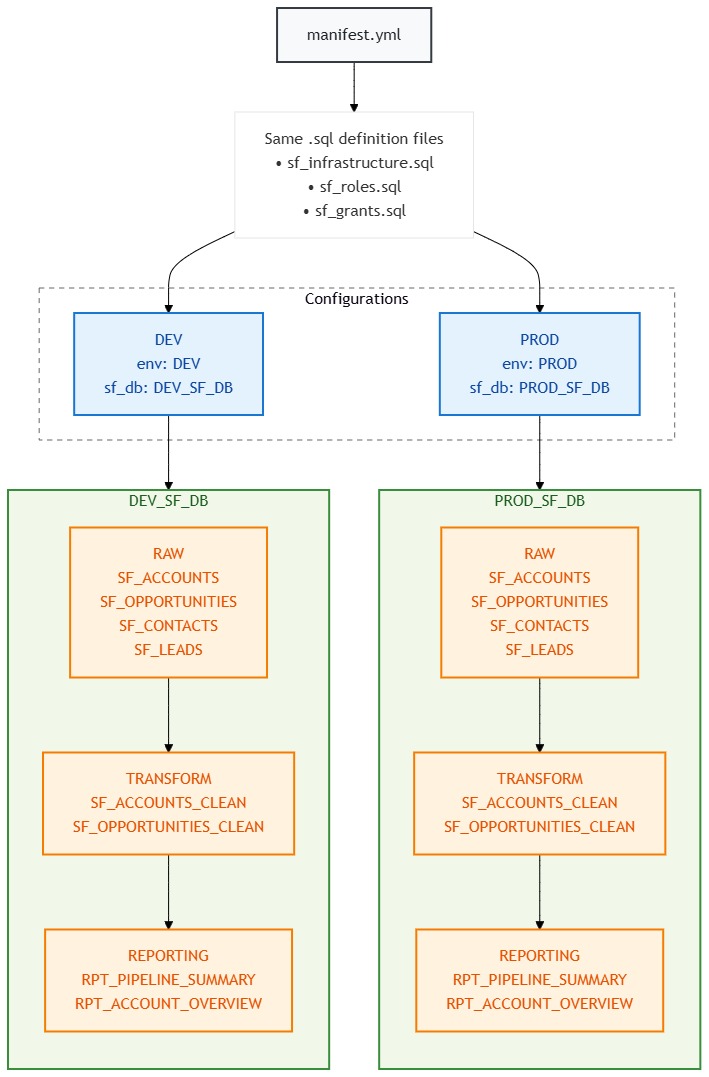
Workflow
The workflow looks something like below:
- You’ll have a
manifest.ymlfile in which you’ll have to mention mainly about environments, owner, etc. and SQL definition files - Create a DCM Project for each target environment
- Define Snowflake objects in the DCM project files
- If you have any variables or macros, throw them in
- Dry run plan to see the deployments and see how the changes would look like
- Hit Deploy
- Monitor the situation (it’s important to monitor the situation)
- Update project files → review the plan → hit deploy → Repeat
Architecture Overview
Dev/Prod Environment Layout
Same SQL files, two completely isolated environments. The {{ env }} variable does all the heavy lifting.
Role Hierarchy ; Who Can Access What
We follow Snowflake’s recommended pattern: Functional Roles (what you do) inherit from Access Roles (what you can touch). Think of it as: functional roles are job titles, access roles are key cards.

What each functional role can do:
| Functional Role | RAW | TRANSFORM | REPORTING |
|---|---|---|---|
FR_*_SF_INGEST | WRITE | READ | ; |
FR_*_SF_TRANSFORM | READ | WRITE | ; |
FR_*_SF_REPORTING | ; | READ | WRITE |
The * is either DEV or PROD ; same structure, different names.
CI/CD Flow ; From Code to Snowflake
This is the part where things get spicy. You push code, GitHub does the work, Snowflake gets the objects.

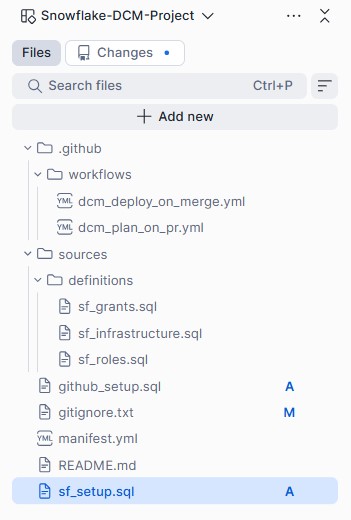
Project Folder Structure
your-github-repo/ OR Snowsight Workspace
├── .github/workflows/
│   ├── dcm_plan_on_pr.yml          ← Runs PLAN on every PR
│   └── dcm_deploy_on_merge.yml     ← Deploys on merge to main
├── .snowflake/
│   └── config.toml                  ← Snowflake CLI config
├── manifest.yml                     ← The control center
└── sources/
    └── definitions/
        ├── sf_infrastructure.sql    ← Schemas & tables
        ├── sf_roles.sql             ← Functional & access roles
        └── sf_grants.sql            ← All the wiring
Project Setup
Before we start defining objects, we need to lay the groundwork. Think of this as building the foundation before you put up walls.
Step 1: Create a Dedicated Role
Don’t use ACCOUNTADMIN for DCM. Just don’t. Create a dedicated role with only the privileges it needs:
USE ROLE ACCOUNTADMIN;

CREATE ROLE IF NOT EXISTS DCM_ADMIN
    COMMENT = 'Dedicated role for DCM project management and deployment';

GRANT CREATE DATABASE  ON ACCOUNT TO ROLE DCM_ADMIN;
GRANT CREATE WAREHOUSE ON ACCOUNT TO ROLE DCM_ADMIN;
GRANT CREATE ROLE      ON ACCOUNT TO ROLE DCM_ADMIN;
GRANT USAGE ON WAREHOUSE COMPUTE_WH TO ROLE DCM_ADMIN;

GRANT ROLE DCM_ADMIN TO USER <your_username>;
GRANT ROLE DCM_ADMIN TO ROLE SYSADMIN;
Step 2: Create the Parent Databases
A DCM project lives inside a database, and here’s a fun gotcha, it cannot manage its own parent database. So we create them upfront. Notice we switch to DCM_ADMIN here, everything from this point onwards is created by this role, so it automatically owns everything. No ownership transfer headaches later.
USE ROLE DCM_ADMIN;

CREATE DATABASE IF NOT EXISTS DEV_SF_DB;
CREATE DATABASE IF NOT EXISTS PROD_SF_DB;
Step 3: Create DCM Project Objects
These are the Snowflake objects that track your deployment state and history. One per environment (still running as DCM_ADMIN):
CREATE DCM PROJECT IF NOT EXISTS DEV_SF_DB.PUBLIC.SALESFORCE_DCM_DEV
    COMMENT = 'Salesforce DCM Project - Development';

CREATE DCM PROJECT IF NOT EXISTS PROD_SF_DB.PUBLIC.SALESFORCE_DCM_PROD
    COMMENT = 'Salesforce DCM Project - Production';
Step 4: Service User for CI/CD
Your personal account has MFA, which means GitHub Actions can’t log in as you. And honestly, you shouldn’t want it to. Create a service user with key-pair authentication:
USE ROLE ACCOUNTADMIN;

CREATE USER IF NOT EXISTS SVC_DCM_CICD
    TYPE = SERVICE
    COMMENT = 'Service user for DCM CI/CD pipelines via GitHub Actions'
    DEFAULT_ROLE = DCM_ADMIN
    DEFAULT_WAREHOUSE = COMPUTE_WH;

GRANT ROLE DCM_ADMIN TO USER SVC_DCM_CICD;
Generate an RSA key pair on your local machine:
openssl genrsa 2048 | openssl pkcs8 -topk8 -inform PEM -out dcm_cicd_rsa_key.p8 -nocrypt
openssl rsa -in dcm_cicd_rsa_key.p8 -pubout -out dcm_cicd_rsa_key.pub
Then set the public key on the service user (copy the key content without the BEGIN/END lines):
ALTER USER SVC_DCM_CICD SET RSA_PUBLIC_KEY = '<paste_public_key_here>';The private key goes into GitHub Secrets (we’ll cover that in the CI/CD section). The public key stays in Snowflake. They form a cryptographic pair, GitHub proves its identity by signing a JWT with the private key, Snowflake verifies it with the public key. No passwords flying around.
Important: The private key must be in PKCS#8 format (starts with -----BEGIN PRIVATE KEY-----). If yours says BEGIN RSA PRIVATE KEY, it’s PKCS#1 and Snowflake will reject it.
Step 5: Git Integration
For GitHub Actions to deploy from Git, Snowflake needs to know about your repo:
USE ROLE ACCOUNTADMIN;

-- Store your GitHub PAT
CREATE OR REPLACE SECRET INTEGRATIONS.GITHUB.GH_PAT
  TYPE = PASSWORD
  USERNAME = '<your_github_username>'
  PASSWORD = '<your_github_pat>';

-- Create the API integration
CREATE OR REPLACE API INTEGRATION GITHUB_API_INTEGRATION
  API_PROVIDER = GIT_HTTPS_API
  API_ALLOWED_PREFIXES = ('https://github.com/<your_org>/')
  ALLOWED_AUTHENTICATION_SECRETS = (INTEGRATIONS.GITHUB.GH_PAT)
  ENABLED = TRUE;

-- Create the Git repository object
USE ROLE DCM_ADMIN;

CREATE OR REPLACE GIT REPOSITORY INTEGRATIONS.GITHUB.SALESFORCE_DCM_REPO
  API_INTEGRATION = GITHUB_API_INTEGRATION
  GIT_CREDENTIALS = INTEGRATIONS.GITHUB.GH_PAT
  ORIGIN = 'https://github.com/<your_org>/<your_repo>.git';

-- Grant access to DCM_ADMIN
GRANT USAGE ON INTEGRATION GITHUB_API_INTEGRATION TO ROLE DCM_ADMIN;
GRANT READ ON GIT REPOSITORY INTEGRATIONS.GITHUB.SALESFORCE_DCM_REPO TO ROLE DCM_ADMIN;
Step 6: The manifest.yml ; The Brain of the Operation
This is where you tell DCM “here are my environments, here are my variables, figure it out”:
manifest_version: 2
type: DCM_PROJECT

default_target: dev

targets:
  dev:
    account_identifier: <your_account_locator>
    project_name: DEV_SF_DB.PUBLIC.SALESFORCE_DCM_DEV
    project_owner: DCM_ADMIN
    templating_config: dev

  prod:
    account_identifier: <your_account_locator>
    project_name: PROD_SF_DB.PUBLIC.SALESFORCE_DCM_PROD
    project_owner: DCM_ADMIN
    templating_config: prod

templating:
  defaults:
    env: "DEV"
    sf_db: "DEV_SF_DB"
  configurations:
    dev:
      env: "DEV"
      sf_db: "DEV_SF_DB"
    prod:
      env: "PROD"
      sf_db: "PROD_SF_DB"
Two targets, two configurations, one set of SQL files. When you deploy with USING CONFIGURATION dev, every {{ env }} becomes DEV and every {{ sf_db }} becomes DEV_SF_DB. Switch to prod and it’s PROD and PROD_SF_DB. Same blueprint, different house.
Writing Definition Files
This is where the real fun begins. We write DEFINE statements instead of CREATE, and Snowflake figures out whether it needs to CREATE, ALTER, or DROP to match your desired state.
sf_infrastructure.sql ; The Schemas & Tables
DEFINE SCHEMA {{ sf_db }}.RAW;
DEFINE SCHEMA {{ sf_db }}.TRANSFORM;
DEFINE SCHEMA {{ sf_db }}.REPORTING;

-- Raw tables ; straight from Salesforce
DEFINE TABLE {{ sf_db }}.RAW.SF_ACCOUNTS (
    ACCOUNT_ID VARCHAR NOT NULL,
    ACCOUNT_NAME VARCHAR,
    INDUSTRY VARCHAR,
    ANNUAL_REVENUE NUMBER(18,2),
    CREATED_DATE TIMESTAMP_NTZ,
    LAST_MODIFIED_DATE TIMESTAMP_NTZ,
    _LOADED_AT TIMESTAMP_NTZ DEFAULT CURRENT_TIMESTAMP()
);

DEFINE TABLE {{ sf_db }}.RAW.SF_OPPORTUNITIES (
    OPPORTUNITY_ID VARCHAR NOT NULL,
    ACCOUNT_ID VARCHAR,
    OPPORTUNITY_NAME VARCHAR,
    STAGE_NAME VARCHAR,
    AMOUNT NUMBER(18,2),
    CLOSE_DATE DATE,
    CREATED_DATE TIMESTAMP_NTZ,
    _LOADED_AT TIMESTAMP_NTZ DEFAULT CURRENT_TIMESTAMP()
);

-- Transform tables ; cleaned and ready
DEFINE TABLE {{ sf_db }}.TRANSFORM.SF_ACCOUNTS_CLEAN (
    ACCOUNT_ID VARCHAR NOT NULL,
    ACCOUNT_NAME VARCHAR,
    INDUSTRY VARCHAR,
    ANNUAL_REVENUE NUMBER(18,2),
    CREATED_DATE TIMESTAMP_NTZ,
    LAST_MODIFIED_DATE TIMESTAMP_NTZ,
    _LOADED_AT TIMESTAMP_NTZ DEFAULT CURRENT_TIMESTAMP(),
    _TRANSFORMED_AT TIMESTAMP_NTZ DEFAULT CURRENT_TIMESTAMP()
);

-- Reporting tables ; the good stuff
DEFINE TABLE {{ sf_db }}.REPORTING.RPT_PIPELINE_SUMMARY (
    ACCOUNT_ID VARCHAR,
    ACCOUNT_NAME VARCHAR,
    INDUSTRY VARCHAR,
    TOTAL_OPPORTUNITIES NUMBER,
    TOTAL_PIPELINE_VALUE NUMBER(18,2),
    AVG_DEAL_SIZE NUMBER(18,2),
    _REPORT_GENERATED_AT TIMESTAMP_NTZ DEFAULT CURRENT_TIMESTAMP()
);
Notice how every object is prefixed with {{ sf_db }}. In dev this resolves to DEV_SF_DB.RAW.SF_ACCOUNTS, in prod it’s PROD_SF_DB.RAW.SF_ACCOUNTS. One file, two environments. Beautiful.
sf_roles.sql ; The Access Control Layer
-- Access roles ; per-schema READ and WRITE (the key cards)
DEFINE ROLE AR_{{ env }}_SF_RAW_READ;
DEFINE ROLE AR_{{ env }}_SF_RAW_WRITE;
DEFINE ROLE AR_{{ env }}_SF_TRANSFORM_READ;
DEFINE ROLE AR_{{ env }}_SF_TRANSFORM_WRITE;
DEFINE ROLE AR_{{ env }}_SF_REPORTING_READ;
DEFINE ROLE AR_{{ env }}_SF_REPORTING_WRITE;

-- Functional roles ; business function (the job titles)
DEFINE ROLE FR_{{ env }}_SF_INGEST;
DEFINE ROLE FR_{{ env }}_SF_TRANSFORM;
DEFINE ROLE FR_{{ env }}_SF_REPORTING;
In dev you get AR_DEV_SF_RAW_READ, in prod you get AR_PROD_SF_RAW_READ. Completely isolated. No one accidentally writes to prod with a dev role.
sf_grants.sql ; Wiring It All Together
This is where the role hierarchy comes to life. Each WRITE role inherits from its READ counterpart, and functional roles inherit from the access roles they need:
-- RAW READ
GRANT USAGE ON DATABASE {{ sf_db }} TO ROLE AR_{{ env }}_SF_RAW_READ;
GRANT USAGE ON SCHEMA {{ sf_db }}.RAW TO ROLE AR_{{ env }}_SF_RAW_READ;
GRANT SELECT ON ALL TABLES IN SCHEMA {{ sf_db }}.RAW TO ROLE AR_{{ env }}_SF_RAW_READ;

-- RAW WRITE inherits READ (because if you can write, you can read)
GRANT ROLE AR_{{ env }}_SF_RAW_READ TO ROLE AR_{{ env }}_SF_RAW_WRITE;
GRANT CREATE TABLE ON SCHEMA {{ sf_db }}.RAW TO ROLE AR_{{ env }}_SF_RAW_WRITE;
GRANT INSERT, UPDATE, DELETE ON ALL TABLES IN SCHEMA {{ sf_db }}.RAW
    TO ROLE AR_{{ env }}_SF_RAW_WRITE;

-- ... same pattern for TRANSFORM and REPORTING ...

-- FUNCTIONAL ROLES ; the actual wiring
-- INGEST: writes to RAW, reads TRANSFORM (to check dependencies)
GRANT ROLE AR_{{ env }}_SF_RAW_WRITE       TO ROLE FR_{{ env }}_SF_INGEST;
GRANT ROLE AR_{{ env }}_SF_TRANSFORM_READ  TO ROLE FR_{{ env }}_SF_INGEST;

-- TRANSFORM: reads RAW, writes to TRANSFORM
GRANT ROLE AR_{{ env }}_SF_RAW_READ        TO ROLE FR_{{ env }}_SF_TRANSFORM;
GRANT ROLE AR_{{ env }}_SF_TRANSFORM_WRITE TO ROLE FR_{{ env }}_SF_TRANSFORM;

-- REPORTING: reads TRANSFORM, writes to REPORTING
GRANT ROLE AR_{{ env }}_SF_TRANSFORM_READ  TO ROLE FR_{{ env }}_SF_REPORTING;
GRANT ROLE AR_{{ env }}_SF_REPORTING_WRITE TO ROLE FR_{{ env }}_SF_REPORTING;

-- All functional roles roll up to DCM_ADMIN (so we don't lock ourselves out)
GRANT ROLE FR_{{ env }}_SF_INGEST    TO ROLE DCM_ADMIN;
GRANT ROLE FR_{{ env }}_SF_TRANSFORM TO ROLE DCM_ADMIN;
GRANT ROLE FR_{{ env }}_SF_REPORTING TO ROLE DCM_ADMIN;
The beauty here is that this entire role hierarchy, 9 roles, dozens of grants, gets created in both dev and prod from the same file. Change it once, deploy everywhere.
PLAN & DEPLOY
Alright, files are written, manifest is set, roles are ready. Time to see if this thing actually works.
PLAN ; The “Let Me See What You’re About to Do” Step
PLAN is a dry run. It reads your definition files, compares them against what currently exists in Snowflake, and tells you exactly what it’s going to CREATE, ALTER, or DROP. No changes are made. Think of it as terraform plan or git diff before committing.
USE ROLE DCM_ADMIN;

EXECUTE DCM PROJECT DEV_SF_DB.PUBLIC.SALESFORCE_DCM_DEV
  PLAN
  USING CONFIGURATION dev
FROM
  'snow://workspace/"USER$<your_username>".PUBLIC."DCM Project"/versions/live/Salesforce_DCM';
The output is a JSON changeset that looks something like this:
{
  "changeset": [
    {"type": "CREATE", "object_id": {"domain": "SCHEMA", "name": "RAW", "fqn": "DEV_SF_DB.RAW"}},
    {"type": "CREATE", "object_id": {"domain": "SCHEMA", "name": "TRANSFORM", "fqn": "DEV_SF_DB.TRANSFORM"}},
    {"type": "CREATE", "object_id": {"domain": "SCHEMA", "name": "REPORTING", "fqn": "DEV_SF_DB.REPORTING"}},
    {"type": "CREATE", "object_id": {"domain": "TABLE", "name": "SF_ACCOUNTS", "fqn": "DEV_SF_DB.RAW.SF_ACCOUNTS"}},
    {"type": "CREATE", "object_id": {"domain": "ROLE", "name": "AR_DEV_SF_RAW_READ"}},
    {"type": "CREATE", "object_id": {"domain": "ROLE", "name": "FR_DEV_SF_INGEST"}},
    ...
  ]
}
Everything shows CREATE because nothing exists yet. On subsequent runs, you’ll see ALTER for modified objects or DROP for removed ones. Always review the PLAN before deploying. Always.
DEPLOY ; The “Do It” Step
Happy with the PLAN? Let’s deploy. The alias is a human-readable label ; like a commit message for your infrastructure:
EXECUTE DCM PROJECT DEV_SF_DB.PUBLIC.SALESFORCE_DCM_DEV
  DEPLOY AS "initial dev deployment"
  USING CONFIGURATION dev
FROM
  'snow://workspace/"USER$<your_username>".PUBLIC."DCM Project"/versions/live/Salesforce_DCM';
That’s it. Snowflake reads the definitions, figures out the diff, and executes the necessary CREATE/ALTER/DROP statements. In our case, it creates 3 schemas, 6 tables, 9 roles, and wires up all the grants. In one command.
Verify ; Trust but Verify
-- Check what DCM is managing
SHOW ENTITIES IN DCM PROJECT DEV_SF_DB.PUBLIC.SALESFORCE_DCM_DEV;

-- Check deployment history
SHOW DEPLOYMENTS IN DCM PROJECT DEV_SF_DB.PUBLIC.SALESFORCE_DCM_DEV;

-- Verify the objects exist
SHOW SCHEMAS IN DATABASE DEV_SF_DB;
SHOW TABLES IN SCHEMA DEV_SF_DB.RAW;
SHOW TABLES IN SCHEMA DEV_SF_DB.TRANSFORM;
SHOW TABLES IN SCHEMA DEV_SF_DB.REPORTING;
SHOW ROLES LIKE '%DEV_SF%';
You should see:
| Object Type | Count | Examples |
|---|---|---|
| Schemas | 3 | RAW, TRANSFORM, REPORTING |
| Tables | 6 | SF_ACCOUNTS, SF_OPPORTUNITIES, SF_ACCOUNTS_CLEAN, SF_OPPORTUNITIES_CLEAN, RPT_PIPELINE_SUMMARY, RPT_ACCOUNT_OVERVIEW |
| Access Roles | 6 | AR_DEV_SF_RAW_READ, AR_DEV_SF_RAW_WRITE, … |
| Functional Roles | 3 | FR_DEV_SF_INGEST, FR_DEV_SF_TRANSFORM, FR_DEV_SF_REPORTING |
Now Deploy Prod ; Same Files, Different Config
Once dev looks good, deploy prod. Same command, different configuration:
EXECUTE DCM PROJECT PROD_SF_DB.PUBLIC.SALESFORCE_DCM_PROD
  PLAN
  USING CONFIGURATION prod
FROM
  'snow://workspace/"USER$<your_username>".PUBLIC."DCM Project"/versions/live/Salesforce_DCM';

-- Happy with the plan? Deploy.
EXECUTE DCM PROJECT PROD_SF_DB.PUBLIC.SALESFORCE_DCM_PROD
  DEPLOY AS "initial prod deployment"
  USING CONFIGURATION prod
FROM
  'snow://workspace/"USER$<your_username>".PUBLIC."DCM Project"/versions/live/Salesforce_DCM';
And just like that, PROD_SF_DB has the exact same structure as DEV_SF_DB ; same schemas, same tables, same role hierarchy ; but with PROD in the names instead of DEV. No copy-paste errors, no “oh I forgot to create that role in prod.”
Day-2: Making Changes
Here’s where DCM really shines. Say you need to add a new table SF_LEADS to RAW. You:
- Add the DEFINE statement to
sf_infrastructure.sql - Run PLAN ; it shows
CREATE TABLE DEV_SF_DB.RAW.SF_LEADS(only the diff!) - Run DEPLOY ; only the new table gets created, nothing else is touched
DCM doesn’t re-create everything. It only applies the delta. That’s the whole point of declarative infrastructure.
CI/CD with GitHub Actions
So far we’ve been running PLAN and DEPLOY manually from Snowsight. That works, but let’s be real, we’re engineers, we automate things. The goal: push code to GitHub, and let GitHub Actions handle the rest.
How It Works ; The 30-Second Version
GitHub Actions are workflows that run automatically when something happens in your repo. We set up two triggers:
- Open a Pull Request → automatically runs PLAN and posts the changeset as a comment on the PR
- Merge to main → automatically deploys to DEV, then waits for manual approval before deploying to PROD
That’s it. No logging into Snowsight to run DEPLOY. No “hey, did someone deploy that change?” in Slack. It’s all tracked in Git.
GitHub Secrets Setup
Before the workflows can talk to Snowflake, they need credentials. Go to your GitHub repo → Settings → Secrets and variables → Actions → New repository secret and add:
| Secret Name | Value |
|---|---|
SNOWFLAKE_ACCOUNT | <your_org>-<your_account> (org-account format, e.g. MYORG-MYACCOUNT) |
SNOWFLAKE_USER | SVC_DCM_CICD |
SNOWFLAKE_PRIVATE_KEY | Contents of your dcm_cicd_rsa_key.p8 file (include the BEGIN/END lines) |
Heads up: The account format here is org-account (e.g. MYORG-MYACCOUNT), not the locator format (e.g. abc12345). The Snowflake CLI connects externally and needs the full org-account format for DNS resolution. You can find yours by running:
SELECT CURRENT_ORGANIZATION_NAME() || '-' || CURRENT_ACCOUNT_NAME();GitHub Environment Setup (for Prod Gate)
This is what prevents your CI/CD from yolo-deploying to production:
- GitHub repo → Settings → Environments → New environment
- Name it
production - Check Required reviewers → add yourself (or your team)
- Click Save
Now the prod deploy job will pause and wait for someone to click “Approve” before proceeding.
Workflow 1: PLAN on Pull Request
This is the “show me what you’re about to do” workflow. Every time someone opens a PR that touches sources/ or manifest.yml, it runs PLAN and posts the output as a PR comment.
name: DCM Plan on PR

on:
  pull_request:
    branches: [main]
    paths:
      - 'sources/**'
      - 'manifest.yml'

jobs:
  plan:
    runs-on: ubuntu-latest
    steps:
      - uses: actions/checkout@v4

      - name: Install Snowflake CLI
        uses: snowflakedb/snowflake-cli-action@v2.0

      - name: Fetch Git Repo in Snowflake
        env:
          SNOWFLAKE_AUTHENTICATOR: SNOWFLAKE_JWT
          SNOWFLAKE_ACCOUNT: ${{ secrets.SNOWFLAKE_ACCOUNT }}
          SNOWFLAKE_USER: ${{ secrets.SNOWFLAKE_USER }}
          SNOWFLAKE_PRIVATE_KEY_RAW: ${{ secrets.SNOWFLAKE_PRIVATE_KEY }}
          SNOWFLAKE_ROLE: DCM_ADMIN
          SNOWFLAKE_WAREHOUSE: COMPUTE_WH
        run: |
          snow sql -q "ALTER GIT REPOSITORY INTEGRATIONS.GITHUB.SALESFORCE_DCM_REPO FETCH;" -x

      - name: Run DCM Plan (DEV)
        env:
          SNOWFLAKE_AUTHENTICATOR: SNOWFLAKE_JWT
          SNOWFLAKE_ACCOUNT: ${{ secrets.SNOWFLAKE_ACCOUNT }}
          SNOWFLAKE_USER: ${{ secrets.SNOWFLAKE_USER }}
          SNOWFLAKE_PRIVATE_KEY_RAW: ${{ secrets.SNOWFLAKE_PRIVATE_KEY }}
          SNOWFLAKE_ROLE: DCM_ADMIN
          SNOWFLAKE_WAREHOUSE: COMPUTE_WH
        run: |
          snow sql -q "
            EXECUTE DCM PROJECT DEV_SF_DB.PUBLIC.SALESFORCE_DCM_DEV
              PLAN
              USING CONFIGURATION dev
            FROM
              @INTEGRATIONS.GITHUB.SALESFORCE_DCM_REPO/branches/${{ github.head_ref }}/;
          " -x --format json > plan_output.json
          cat plan_output.json

      - name: Post Plan Output to PR
        uses: actions/github-script@v7
        with:
          script: |
            const fs = require('fs');
            const plan = fs.readFileSync('plan_output.json', 'utf8');
            github.rest.issues.createComment({
              issue_number: context.issue.number,
              owner: context.repo.owner,
              repo: context.repo.repo,
              body: '## DCM Plan Output (DEV)\n```json\n' + plan.substring(0, 60000) + '\n```'
            });
Let’s break down what’s happening:
on: pull_request; triggers when a PR is opened againstmainpaths; only runs if files insources/ormanifest.ymlchanged (no point running PLAN if you only edited the README)SNOWFLAKE_PRIVATE_KEY_RAW; the env var name the CLI expects for inline private keys-xflag ; tells snow CLI to use a temporary connection from environment variables instead of a config file@INTEGRATIONS.GITHUB.SALESFORCE_DCM_REPO/branches/${{ github.head_ref }}/; this is the magic. It runs PLAN against the PR branch, not main. So you see exactly what your changes would doactions/github-script; posts the PLAN output as a comment on your PR, so your team can review it right there
Workflow 2: DEPLOY on Merge
When the PR is approved and merged to main, this workflow takes over:
name: DCM Deploy on Merge

on:
  push:
    branches: [main]
    paths:
      - 'sources/**'
      - 'manifest.yml'

jobs:
  deploy-dev:
    runs-on: ubuntu-latest
    env:
      SNOWFLAKE_AUTHENTICATOR: SNOWFLAKE_JWT
      SNOWFLAKE_ACCOUNT: ${{ secrets.SNOWFLAKE_ACCOUNT }}
      SNOWFLAKE_USER: ${{ secrets.SNOWFLAKE_USER }}
      SNOWFLAKE_PRIVATE_KEY_RAW: ${{ secrets.SNOWFLAKE_PRIVATE_KEY }}
      SNOWFLAKE_ROLE: DCM_ADMIN
      SNOWFLAKE_WAREHOUSE: COMPUTE_WH
    steps:
      - uses: actions/checkout@v4

      - name: Install Snowflake CLI
        uses: snowflakedb/snowflake-cli-action@v2.0

      - name: Fetch Git Repo in Snowflake
        run: |
          snow sql -q "ALTER GIT REPOSITORY INTEGRATIONS.GITHUB.SALESFORCE_DCM_REPO FETCH;" -x

      - name: Plan DEV
        run: |
          snow sql -q "
            EXECUTE DCM PROJECT DEV_SF_DB.PUBLIC.SALESFORCE_DCM_DEV
              PLAN USING CONFIGURATION dev
            FROM @INTEGRATIONS.GITHUB.SALESFORCE_DCM_REPO/branches/main/;
          " -x

      - name: Deploy DEV
        run: |
          snow sql -q "
            EXECUTE DCM PROJECT DEV_SF_DB.PUBLIC.SALESFORCE_DCM_DEV
              DEPLOY AS \"CI/CD deploy - commit ${{ github.sha }}\"
              USING CONFIGURATION dev
            FROM @INTEGRATIONS.GITHUB.SALESFORCE_DCM_REPO/branches/main/;
          " -x

  deploy-prod:
    runs-on: ubuntu-latest
    needs: deploy-dev
    environment: production        # ← This is the approval gate!
    env:
      SNOWFLAKE_AUTHENTICATOR: SNOWFLAKE_JWT
      SNOWFLAKE_ACCOUNT: ${{ secrets.SNOWFLAKE_ACCOUNT }}
      SNOWFLAKE_USER: ${{ secrets.SNOWFLAKE_USER }}
      SNOWFLAKE_PRIVATE_KEY_RAW: ${{ secrets.SNOWFLAKE_PRIVATE_KEY }}
      SNOWFLAKE_ROLE: DCM_ADMIN
      SNOWFLAKE_WAREHOUSE: COMPUTE_WH
    steps:
      - uses: actions/checkout@v4

      - name: Install Snowflake CLI
        uses: snowflakedb/snowflake-cli-action@v2.0

      - name: Fetch Git Repo in Snowflake
        run: |
          snow sql -q "ALTER GIT REPOSITORY INTEGRATIONS.GITHUB.SALESFORCE_DCM_REPO FETCH;" -x

      - name: Deploy PROD
        run: |
          snow sql -q "
            EXECUTE DCM PROJECT PROD_SF_DB.PUBLIC.SALESFORCE_DCM_PROD
              DEPLOY AS \"CI/CD deploy - commit ${{ github.sha }}\"
              USING CONFIGURATION prod
            FROM @INTEGRATIONS.GITHUB.SALESFORCE_DCM_REPO/branches/main/;
          " -x
Key things to note:
deploy-devruns automatically ; the moment code hits main, DEV gets updated. No questions asked.deploy-prodhasneeds: deploy-dev; it won’t start until DEV succeeds. If DEV deployment fails, PROD is safe.environment: production; this is what triggers the approval gate. The workflow pauses here and sends a notification. Someone has to go to GitHub Actions and click “Approve” before PROD deploys.- Deploy alias uses
${{ github.sha }}; every deployment is tagged with the Git commit hash. So when you runSHOW DEPLOYMENTS, you can trace exactly which commit caused which change. Traceability for free.
The Full Journey ; What Happens When You Add a Table
Let’s walk through a real example. You want to add SF_LEADS to the RAW schema:
1. Create a feature branch and make the change:
git checkout -b feature/add-leads-table
Add to sf_infrastructure.sql:
DEFINE TABLE {{ sf_db }}.RAW.SF_LEADS (
    LEAD_ID VARCHAR NOT NULL,
    FIRST_NAME VARCHAR,
    LAST_NAME VARCHAR,
    COMPANY VARCHAR,
    EMAIL VARCHAR,
    LEAD_SOURCE VARCHAR,
    STATUS VARCHAR,
    CREATED_DATE TIMESTAMP_NTZ,
    _LOADED_AT TIMESTAMP_NTZ DEFAULT CURRENT_TIMESTAMP()
);
2. Push and open a PR:
git add . && git commit -m "Add SF_LEADS table" && git push origin feature/add-leads-table
Open a PR on GitHub.
3. GitHub Actions kicks in:
- The
DCM Plan on PRworkflow starts - It fetches the branch in Snowflake, runs PLAN against it
- Posts a comment on your PR showing:
CREATE TABLE DEV_SF_DB.RAW.SF_LEADS
4. Team reviews the PLAN output on the PR:
- “Looks good, only one new table, no destructive changes” → Approve
5. Merge the PR:
DCM Deploy on Mergeworkflow starts- DEV deploys automatically,
SF_LEADStable is created inDEV_SF_DB.RAW - PROD deploy pauses, waiting for approval
6. Approve PROD deployment in GitHub Actions:
- Go to Actions tab → click the waiting workflow → “Review deployments” → “Approve”
SF_LEADStable is created inPROD_SF_DB.RAW
7. Done. One table added to both environments. Fully tracked in Git. No manual SQL. No “did we deploy that to prod?”
One More Thing ; GitHub Repo Permissions
If your workflow’s PR comment step fails with Resource not accessible by integration, you need to enable write permissions:
- GitHub repo → Settings → Actions → General
- Scroll to Workflow permissions
- Select Read and write permissions
- Check Allow GitHub Actions to create and approve pull requests
- Save
Also, remember: workflow files must exist on main for triggers to work. If your workflows are only on a feature branch, GitHub won’t recognize them. Push your .github/workflows/ files to main first, then create feature branches.
Gotchas & Lessons Learned
These are the things that made me stare at my screen, question my career choices, and then eventually figure out. Saving you the trouble.
1. A DCM Project Cannot Manage Its Own Parent Database
If your DCM project lives at DEV_SF_DB.PUBLIC.SALESFORCE_DCM_DEV, you cannot have DEFINE DATABASE DEV_SF_DB in your definition files. Snowflake will throw:
Project cannot manage its parent database 'DEV_SF_DB'.
Please remove the DEFINE statement for this database.
Fix: Create the parent database in your setup script, not in the DCM definitions.
2. Missing Semicolons in Jinja Loops Will Haunt You
This looks fine but it’s broken:
{% for client in clients %}
    DEFINE TABLE {{ sf_db }}.{{ client }}_WORKSPACE.SALES_EVENTS (
        EVENT_ID NUMBER,
        AMOUNT NUMBER(10,2)
    )
{% endfor %}
The closing ) has no semicolon. DCM concatenates the loop iterations, so the next DEFINE slams into the previous ) and you get a cryptic syntax error. Always end with );:
    );</code>
{% endfor %}
3. manifest_version Must Be 2
Not 1. Not 3. It’s manifest_version: 2. Use anything else and you’ll get a validation error that doesn’t tell you much.
4. Account Identifier Formats ; There Are Two
| Where | Format | Example |
|---|---|---|
manifest.yml | Account locator | abc12345 |
GitHub Secrets (SNOWFLAKE_ACCOUNT) | Org-account | MYORG-MYACCOUNT |
Snowsight uses the locator internally, but the Snowflake CLI connects from outside and needs the org-account format for DNS resolution. If you get a 404 Not Found error on login, this is why.
Find yours with:
SELECT CURRENT_ORGANIZATION_NAME() || '-' || CURRENT_ACCOUNT_NAME();5. Private Key Must Be PKCS#8 Format
Your RSA private key must start with -----BEGIN PRIVATE KEY-----. If it says -----BEGIN RSA PRIVATE KEY-----, that’s PKCS#1 and Snowflake will reject it with:
Private key provided is not in PKCS#8 format. Please use correct format.
Fix: Generate with the pkcs8 flag (which we did), or convert an existing key:
openssl pkcs8 -topk8 -inform PEM -outform PEM -in old_key.p8 -out new_key.p8 -nocrypt6. Workflow Files Must Be on main
This one wasted a good chunk of time. You push your workflow YAML files to a feature branch, open a PR, and… nothing happens. No workflow runs. No errors. Just silence.
GitHub Actions only recognizes workflow files that exist on the base branch (main). If main doesn’t have your .github/workflows/ files, no triggers fire. Push the workflow files to main first, then create feature branches.
7. GitHub Actions Needs Write Permissions
If the “Post Plan Output to PR” step fails with Resource not accessible by integration, the GitHub Actions bot doesn’t have permission to write PR comments.
Fix: Repo → Settings → Actions → General → Workflow permissions → select Read and write permissions → check Allow GitHub Actions to create and approve pull requests.
8. The Project Owner Role Must Own Everything
When DCM deploys, it uses the project_owner role (in our case, DCM_ADMIN). If objects were created by a different role (like ACCOUNTADMIN), DCM can’t manage them.
Fix: Either create everything as DCM_ADMIN from the start (the right way), or transfer ownership later with:
GRANT OWNERSHIP ON DATABASE DEV_SF_DB TO ROLE DCM_ADMIN COPY CURRENT GRANTS;
GRANT OWNERSHIP ON ALL SCHEMAS IN DATABASE DEV_SF_DB TO ROLE DCM_ADMIN COPY CURRENT GRANTS;
GRANT OWNERSHIP ON ALL TABLES IN DATABASE DEV_SF_DB TO ROLE DCM_ADMIN COPY CURRENT GRANTS;
-- ... and don't forget the DCM project objects and roles too
This applies to databases, schemas, tables, DCM project objects, and every role that DCM defines. Yes, all of them. Learn from my pain.
9. include_definitions Is Not a Thing
If you’re coming from dbt or other tools, you might try adding include_definitions to your manifest to control which files get picked up. Don’t. It’s not a valid property. DCM automatically picks up all .sql files in sources/definitions/ and macros from sources/macros/.
10. Files Inside a DCM Workspace Folder Can’t Be Run as SQL
If you create a SQL file inside a DCM project folder in Snowsight, you can’t click “Run” on it. Snowsight treats everything inside the project folder as DCM definition files. If you need to run manual SQL (like setup scripts), create a separate SQL worksheet outside the DCM project folder.
What’s Next
This blog covered the core workflow, but there’s more you can do with DCM Projects:
- Dynamic Tables & Tasks ; DEFINE works with dynamic tables, tasks, and more. Imagine your entire ELT pipeline ; ingestion, transformation, scheduling ; all declared in code.
- Jinja Macros for Reusable Patterns ; We used simple variables here, but you can build macros for standard audit columns, role hierarchies, or even entire schema templates. Write once, use everywhere.
- Branch-Based Environments ; Instead of just dev and prod, spin up ephemeral environments per feature branch. Deploy, test, tear down. Snowflake makes it cheap.
- Multiple Tenants from One Codebase ; Have 10 clients? Define the schema once with a
{{ client_name }}variable, loop through a list in your manifest, and deploy 10 identical but isolated databases. - Drift Detection ; Run PLAN on a schedule (even without deploying). If someone manually changes an object outside DCM, PLAN will show the drift. Now you know who’s been making rogue
ALTER TABLEstatements.
Key Takeaways
-
DCM Projects = Terraform for Snowflake: declarative, stateful, diffable. You define the desired state, Snowflake figures out how to get there.
-
One codebase, multiple environments: Jinja templating and manifest configurations mean you never copy-paste SQL between dev and prod again. Ever.
-
PLAN before DEPLOY, always: It takes 5 seconds and can save you from dropping a production table. There’s no excuse.
-
Roles and grants are code: No more clicking through Snowsight to set up permissions. Define your entire RBAC hierarchy in SQL, version it in Git, deploy it with one command.
-
CI/CD is not optional: Once you’ve tasted automated PLAN-on-PR and DEPLOY-on-merge, you’ll never want to run
EXECUTE DCM PROJECTmanually again. -
Use a dedicated role from the start: Create
DCM_ADMIN, use it for everything. Your future self will thank you when you’re not transferring ownership on 30 objects at 11pm. -
Gotchas are real: Parent database limitation, PKCS#8 keys, account identifier formats, workflow files on main. Bookmark this blog (shameless plug).
The complete code for this project is available on GitHub.
References: Snowflake DCM Projects