~ Prajwal N S
Interview Questions:
Info
account usage-information schema
1. Snowflake Overview
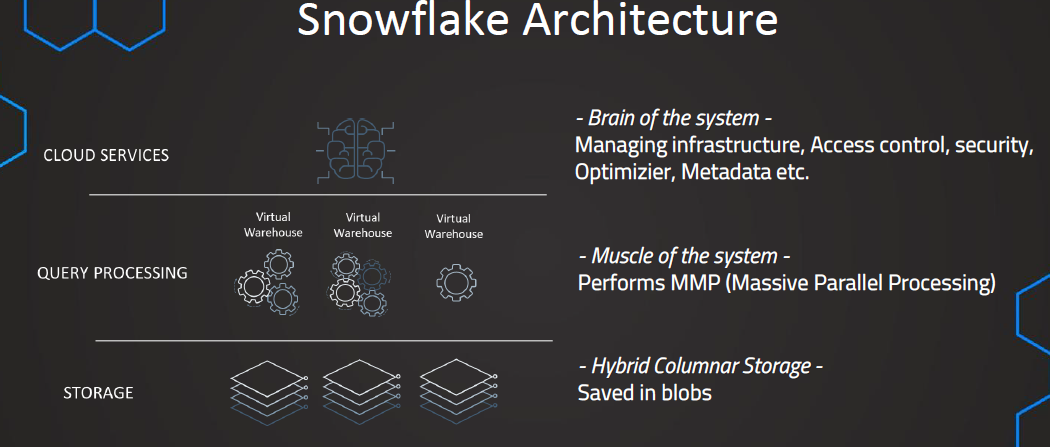
- First layer: Storage
- Data is stored in Amazon S3 buckets
- Data is stored using hybrid columnar storage, where data is compressed into blobs instead of rows
- Hybrid columnar storage is efficient and fast for storing and querying data
- Second layer: Query processing
- Queries are processed in the virtual warehouses
- Virtual warehouses are virtual compute resources used for processing queries and operations
- Virtual warehouses enable massive parallel processing for efficient query processing
- Third layer: Cloud services
- Also known as the brain of the system
- Manages infrastructure, access control, security, metadata, query optimization, etc.
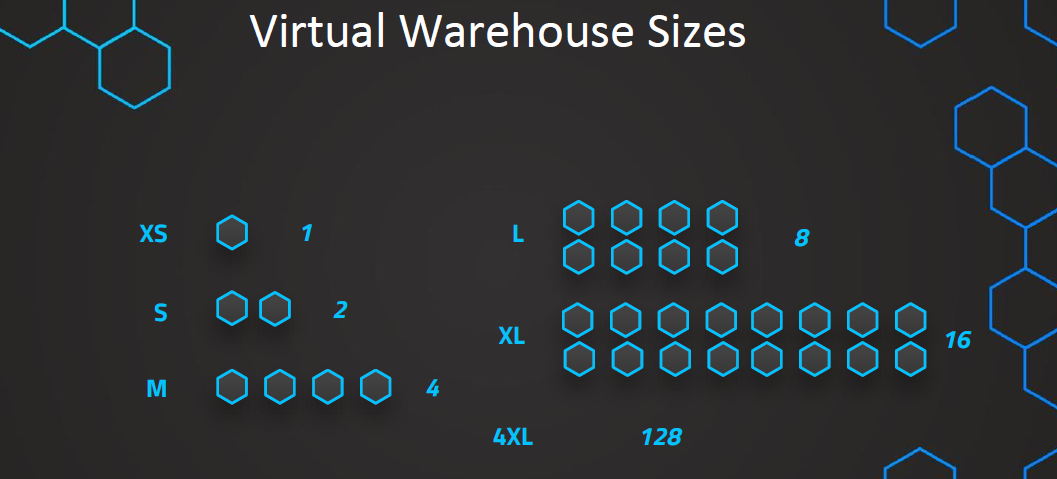
2. Virtual Warehouses
-
Virtual warehouses are virtual compute instances used to process queries on data in Snowflake.
-
Virtual warehouses can have different sizes:
- Extra Small: Consists of one server, suitable for less complex queries.
- Sizes increase in powers of 2 (e.g., Small, Medium, Large, Extra Large) with double the number of servers.
- Extra Large: Consists of 128 servers, suitable for more complex queries.
-
The larger the virtual warehouse, the more expensive it is.
-
Credits are used to pay for the virtual warehouse usage. One credit is consumed per hour when the warehouse is active, billed by seconds with a minimum of one minute.
-
If there is high query demand and the current warehouse size cannot handle it, queries are queued and processed sequentially.
-
Snowflake offers multi-clustering, which allows clustering multiple warehouses together to handle increased query demand efficiently.
-
Multi-clustering is available in the enterprise version of Snowflake.
-
Creating virtual warehouses can be done using secure commands or through the interface in Snowflake.
3. Scaling Policy
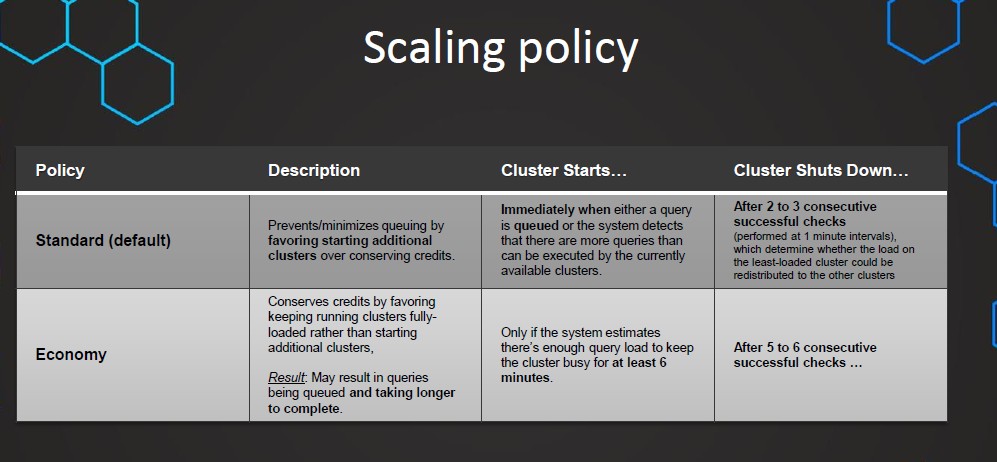
Scaling Up vs Scaling Out:
- Snowflake supports two ways to scale warehouses: scaling up and scaling out.
- Scale up: Resizing a warehouse.
- Scale out: Adding clusters to a multi-cluster warehouse (requires Snowflake Enterprise Edition or higher).
Warehouse Resizing Improves Performance:
- Resizing a warehouse improves query performance, especially for larger and more complex queries.
- It helps reduce queuing when a warehouse lacks compute resources for concurrent queries.
- Resizing is not intended to handle concurrency issues; additional warehouses or multi-cluster warehouses should be used for that.
Considerations for Resizing a Warehouse:
- Snowflake supports resizing a warehouse at any time, even while it’s running.
- Larger size does not guarantee faster performance for smaller, basic queries.
- Resizing a running warehouse only affects queued and new queries, not those already being processed.
- Resizing from a 5XL or 6XL warehouse to a 4XL or smaller results in a brief period of being charged for both warehouses.
Tip: Decreasing the size of a running warehouse affects performance by removing compute resources and dropping associated cache.
Multi-Cluster Warehouses Improve Concurrency:
- Multi-cluster warehouses handle queuing and performance issues with large numbers of concurrent users/queries.
- Recommended for Snowflake Enterprise Edition or higher.
- Multi-cluster warehouses can automate the process based on fluctuating user/query numbers.
Considerations for Multi-Cluster Warehouses:
- All warehouses should be configured as multi-cluster if using Snowflake Enterprise Edition.
- Multi-cluster warehouses should be set to run in Auto-scale mode, allowing automatic cluster start/stop.
- Minimum number of clusters: Keep default value of 1 for on-demand starting. Increase if high-availability is a concern.
- Maximum number of clusters: Set as large as possible, considering warehouse size and credit costs.
Example: An X-Large multi-cluster warehouse with maximum clusters = 10 consumes 160 credits in an hour if all 10 clusters run continuously.
Analogy and different explanation
Defining “Warehouse” in Snowflake:
- People who have been working with data for awhile might think of the term “Data Warehouse” as referring to a special collection of data structures, but in Snowflake, warehouses don’t store data.
- In Snowflake, Warehouses are “workforces” — they are used to perform the processing of data.
- When you create a Warehouse in Snowflake, you are defining a “workforce.”
Teams are Clusters, Team Members are Servers:
- the workforce of each warehouse is a team. A small warehouse has a small team, but just one team. An extra-large warehouse has a large team, but just one team.
- Snowflake Warehouse Sizes like extra-Small, Small, Medium, etc. all have one cluster. A small warehouse has one cluster made up of just a few servers. A larger warehouse has one cluster, made up of more servers.
Scaling Up and Down:
- Changing the size of warehouse changes the number of servers in the cluster.
- Changing the size of an existing warehouse is called scaling up or scaling down.
Scaling In and Out:
- If multi-cluster/elastic warehousing is available (Enterprise edition or above) a warehouse is capable of scaling out in times of increased demand. (Adding temporary teams, made up of a collection of temporary workers).
- If multi-cluster scaling out takes place, clusters are added for the period of demand and then clusters are removed (snap back) when demand decreases. (Removing temporary teams).
- The number of servers in the original cluster dictates the number of servers in each cluster during periods where the warehouse scales out by adding clusters.
4. Snowflake Editions
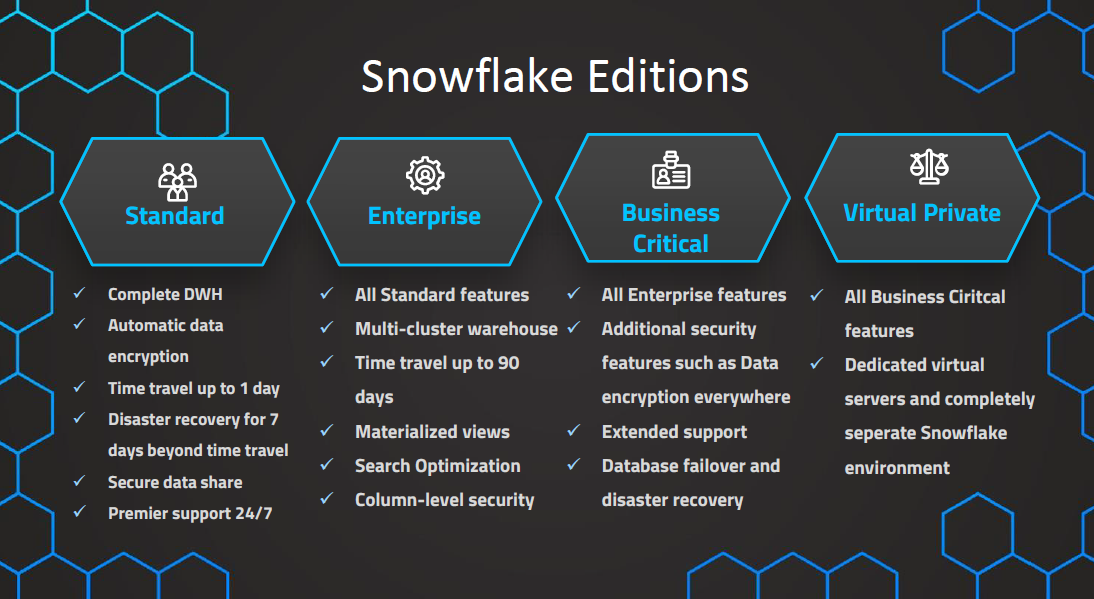
Snowflake Editions:
- Snowflake offers multiple editions to meet specific organizational requirements.
- Editions can be changed easily as the organization’s needs evolve.
- The chosen edition determines unit costs for credits and data storage.
- Pricing varies based on region and account type (On Demand or Capacity).
Overview of Editions:
- Standard Edition:
-
Introductory level offering with full access to Snowflake’s standard features.
-
Provides a balance between features, support, and cost.
- Enterprise Edition:
-
Includes all features and services of Standard Edition.
-
Designed for large-scale enterprises and organizations.
-
Offers additional features tailored to enterprise needs.
- Business Critical Edition:
-
Formerly known as Enterprise for Sensitive Data (ESD).
-
Provides higher levels of data protection.
-
Suitable for organizations with extremely sensitive data, especially PHI data under HIPAA and HITRUST CSF regulations.
-
Includes enhanced security, data protection, database failover/failback, and business continuity support.
- Virtual Private Snowflake (VPS):
- Highest level of security for organizations with strict requirements.
- Designed for financial institutions and large enterprises dealing with highly sensitive data.
- Includes all features and services of Business Critical Edition.
- VPS environment is isolated from other Snowflake accounts.
- Data sharing with non-VPS customers can be enabled upon request.
5. Snowflake Roles
Important
Access control framework
Snowflake’s approach to access control combines aspects from both of the following models:
- Discretionary Access Control (DAC): Each object has an owner, who can in turn grant access to that object.
- Role-based Access Control (RBAC): Access privileges are assigned to roles, which are in turn assigned to users.
The key concepts to understanding access control in Snowflake are:
-
Securable object: An entity to which access can be granted. Unless allowed by a grant, access is denied.
-
Role: An entity to which privileges can be granted. Roles are in turn assigned to users. Note that roles can also be assigned to other roles, creating a role hierarchy.
-
Privilege: A defined level of access to an object. Multiple distinct privileges may be used to control the granularity of access granted.
-
User: A user identity recognized by Snowflake, whether associated with a person or program.
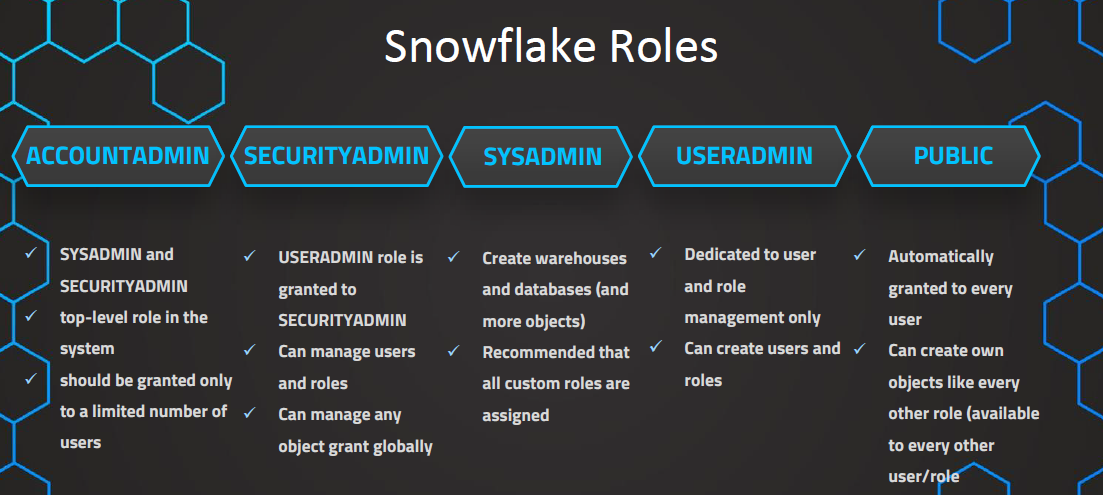
System-Defined Roles:
- ORGADMIN: Manages operations at the organization level, creates accounts, and views organization information.
- ACCOUNTADMIN: Top-level role that includes SYSADMIN and SECURITYADMIN roles, granted to limited users.
- SECURITYADMIN: Manages global grants, users, roles, and inherits privileges from USERADMIN.
- USERADMIN: Dedicated to user and role management, creates users and roles, and manages owned users and roles.
- SYSADMIN: Manages warehouses, databases, and objects, can grant privileges to other roles.
- PUBLIC: Automatically granted to all users and roles, can own objects accessible to everyone.
- Custom Roles:
- Custom roles can be created using USERADMIN or higher roles, or any role with CREATE ROLE privilege.
- Custom database roles can be created by the database owner.
- Newly-created roles are not assigned or granted by default.
- Snowflake recommends a role hierarchy with the top-most custom role assigned to SYSADMIN for object management and USERADMIN for user and role management.
- System administrators can only manage objects owned by roles assigned to SYSADMIN or with MANAGE GRANTS privilege (default: SECURITYADMIN).
Higher Roles Have Custodial Oversight
- Higher roles, like ACCOUNTADMIN, exercise custodial oversight similar to parental rights in a parent-child analogy.
- Just as parents have authority over their child’s possessions, ACCOUNTADMIN can control objects created by roles like SYSADMIN.
- This authority enables ACCOUNTADMIN to modify, transfer, or delete objects owned by SYSADMIN.
- In contrast, SYSADMIN lacks similar authority over objects owned by ACCOUNTADMIN.
Important
Which system defined roles to use on particular situations: https://www.analytics.today/blog/snowflake-system-defined-roles-best-practice#:~:text=SECURITYADMIN%3A Which can create users,the objects it has created.
Hands-on — Creating users
Blueprint
/*

--------------------------------------------------------------------------------------------------------------------
USERADMIN -- CREATES ROLES AND USERS
			 GRANTS ROLES
SYSADMIN -- CREATES SECURABLE OBJECTS(DB, SCHEMA, TABLE, VIEWS, ETC., )
SECURITYADMIN -- INHERITS THE PRIVILEGES FROM USERADMIN BUT CAN MANAGE IT GLOBALLY NOT SPECIFIED TO THE CREATED USER/ROLES
--------------------------------------------------------------------------------------------------------------------
GOAL IS TO CREATE THREE ROLES AND USERS FOR RESPECTIVE DEPARTMENTS
DEPARTMENTS - SALES, FINANCE AND HR
--------------------------------------------------------------------------------------------------------------------

USING USERADMIN
	|
CREATING ROLES -- HR, FINANCE, SALES
	|
CREATING ROLE HIEARARCHY
	|
GRANTING ROLE TO THE CREATED ROLES(HR, FINANCE, SALES) -- HIEARARCHY CREATED
	|
USING SYSADMIN TO CREATE WH - SALES, FINANCE, HR
	|
CREATING DB - SALES, FINANCE, HR
	|
CREATING SCHEMA - SALES, FINANCE, HR
	|
USING USERADMIN - CREATING USERS - SALES, FINANCE, HR
	|
USING SECURITYADMIN GRANTING ROLES TO USERS - SALES, FINANCE, HR
	|
USING SYSADMIN GRANTING USAGE ON DATABASE TO ROLES WHICH ARE CREATED(SALES, FINANCE, HR )
	|
USING SYSADMIN GRANTING ALL PRIVILEGES ON SCHEMA LEVEL TO THE ROLES WHICH ARE CREATED(SALES, FINANCE, HR )
	|
USING SYSADMIN - CREATING TABLE - SALES, FINANCE, HR

*/
scripts
-- setting context
USE ROLE SECURITYADMIN;

-- DEFAULT PRIVILEGES TO ACCOUNT OBJECT
SHOW GRANTS ON ACCOUNT;

-- creating Sales and Finance Roles

USE ROLE USERADMIN;
CREATE OR REPLACE role SALES;
CREATE OR REPLACE role FINANCE ;
CREATE OR REPLACE role HR ;


-- list of all roles
SHOW ROLES;

-- creating role hieararchy

GRANT role SALES to role SYSADMIN;
GRANT role FINANCE to role SYSADMIN;
GRANT role HR to role SYSADMIN;

-- list of all users
USE ROLE SECURITYADMIN;
SHOW USERS;

-- create warehouse
USE ROLE SYSADMIN;

CREATE OR REPLACE WAREHOUSE MRF_SALES_WH;
GRANT ALL ON WAREHOUSE MRF_SALES_WH TO ROLE SALES;

CREATE OR REPLACE WAREHOUSE MRF_FINANCE_WH;
GRANT ALL ON WAREHOUSE MRF_FINANCE_WH TO ROLE FINANCE;

CREATE OR REPLACE WAREHOUSE MRF_HR_WH;
GRANT ALL ON WAREHOUSE MRF_HR_WH TO ROLE HR;

--create database and schema
CREATE OR REPLACE DATABASE MRF_DB;

CREATE SCHEMA MRF_DB.SALES;
CREATE SCHEMA MRF_DB.FINANCE;
CREATE SCHEMA MRF_DB.HR;
DROP SCHEMA MRF_DB.PUBLIC;

--User Creation
USE ROLE USERADMIN;
CREATE OR REPLACE USER aa_user PASSWORD = 'Snowflake123*' DEFAULT_ROLE = 'ACCOUNTADMIN' DEFAULT_NAMESPACE = 'MRF_DB.SALES' DEFAULT_WAREHOUSE = 'MRF_WH' MUST_CHANGE_PASSWORD = FALSE;
CREATE OR REPLACE USER sa_user PASSWORD = 'Snowflake123*' DEFAULT_ROLE = 'SYSADMIN' DEFAULT_NAMESPACE = 'MRF_DB.SALES' DEFAULT_WAREHOUSE = 'MRF_WH' MUST_CHANGE_PASSWORD = FALSE;
CREATE OR REPLACE USER sales_user PASSWORD = 'Snowflake123*' DEFAULT_ROLE = 'SALES' DEFAULT_NAMESPACE = 'MRF_DB.SALES' DEFAULT_WAREHOUSE = 'MRF_SALES_WH' MUST_CHANGE_PASSWORD = FALSE;
CREATE OR REPLACE USER finance_user PASSWORD = 'Snowflake123*' DEFAULT_ROLE = 'FINANCE' DEFAULT_NAMESPACE = 'MRF_DB.FINANCE' DEFAULT_WAREHOUSE = 'MRF_FINANCE_WH' MUST_CHANGE_PASSWORD = FALSE;
CREATE OR REPLACE USER hr_user PASSWORD = 'Snowflake123*' DEFAULT_ROLE = 'HR' DEFAULT_NAMESPACE = 'MRF_DB.HR' DEFAULT_WAREHOUSE = 'MRF_HR_WH' MUST_CHANGE_PASSWORD = FALSE;

USE ROLE SECURITYADMIN;
GRANT ROLE SALES TO USER sales_user;
GRANT ROLE FINANCE TO USER finance_user;
GRANT ROLE HR TO USER hr_user;


USE ROLE SYSADMIN;
GRANT USAGE ON DATABASE MRF_DB TO ROLE SALES;
GRANT USAGE ON DATABASE MRF_DB TO ROLE FINANCE;
GRANT USAGE ON DATABASE MRF_DB TO ROLE HR;

GRANT ALL ON SCHEMA MRF_DB.SALES TO ROLE SALES;
GRANT ALL ON SCHEMA MRF_DB.FINANCE TO ROLE FINANCE;
GRANT ALL ON SCHEMA MRF_DB.HR TO ROLE HR;

--Table Creation
USE ROLE SALES;
USE SCHEMA MRF_DB.SALES;
CREATE TABLE customer (
   ID                   NUMBER                  IDENTITY,
   FIRSTNAME            VARCHAR(40)         NOT NULL,
   LASTNAME             VARCHAR(40)         NOT NULL,
   CITY                 VARCHAR(40)         NULL,
   COUNTRY              VARCHAR(40)         NULL,
   PHONE                VARCHAR(20)         NULL
);
USE ROLE FINANCE;
USE SCHEMA MRF_DB.FINANCE;
CREATE TABLE customer(
   ID                   NUMBER              IDENTITY,
   FIRSTNAME            VARCHAR(40)         NOT NULL,
   LASTNAME             VARCHAR(40)         NOT NULL,
   CITY                 VARCHAR(40)         NULL,
   COUNTRY              VARCHAR(40)         NULL,
   PHONE                VARCHAR(20)         NULL
);
USE ROLE HR;
USE SCHEMA MRF_DB.HR;
CREATE OR REPLACE TABLE EMP_BASIC
(
	FIRST_NAME STRING,
	LAST_NAME STRING,
	EMAIL STRING,
	STREETADDRESS STRING,
	CITY STRING,
	START_DATE DATE
);


-- TABLE OBJECT PRIVILEGES TO ROLES
USE ROLE SYSADMIN;
SHOW GRANTS ON DATABASE MRF_DB;
SHOW GRANTS ON SCHEMA MRF_DB.SALES;
SHOW GRANTS ON SCHEMA MRF_DB.FINANCE;
SHOW GRANTS ON SCHEMA MRF_DB.HR;
SHOW GRANTS ON TABLE MRF_DB.SALES.CUSTOMER;
SHOW GRANTS ON TABLE MRF_DB.FINANCE.CUSTOMER;
SHOW GRANTS ON TABLE MRF_DB.HR.EMP_BASIC;
6. Creating STAGE
Creating a new named internal or external stage in Snowflake involves setting up a location for loading data from files into Snowflake tables and unloading data from tables into files. Here’s a detailed explanation:
- Internal Stage:
- Stores data files within Snowflake itself.
- Internal stages can be permanent or temporary, providing flexibility in data management.
- Permanent internal stages persist across sessions, while temporary stages exist only for the duration of the session.
- They are suitable for storing data files that are generated or processed within Snowflake.
- Internal stages can be used for efficient data loading and unloading operations without relying on external storage services.
- External Stage:
- References data files stored in locations outside of Snowflake, such as cloud storage services.
- Supported cloud storage services include Amazon S3 buckets, Google Cloud Storage buckets, and Microsoft Azure containers.
- External stages offer flexibility in accessing data stored in diverse cloud storage environments.
- The storage location can be either private/protected or public, allowing for different levels of access control.
- Notably, data held in archival cloud storage classes that require restoration before retrieval cannot be accessed directly.
- Examples of such archival storage classes include Amazon S3 Glacier Flexible Retrieval or Glacier Deep Archive, and Microsoft Azure Archive Storage.
- Directory Table:
- An internal or external stage can include a directory table.
- Directory tables serve as catalogs of staged files in cloud storage.
- They provide metadata information about the files stored in the stage, facilitating efficient file management and querying.
- Directory tables help organize and track staged files, enhancing data accessibility and governance within Snowflake.
| Source location | Target location |
| Internal named stage | Internal named stage |
| External stage | Internal named stage |
| Internal named stage | External stage |
| External stage | External stage |
Important
File staging commands: https://docs.snowflake.com/en/sql-reference/commands-file
Overall, internal and external stages in Snowflake offer versatile solutions for managing data loading and unloading operations, catering to various storage requirements and environments, whether within Snowflake or across external cloud storage services.
// Database to manage stage objects, fileformats etc.

CREATE OR REPLACE DATABASE MANAGE_DB;

CREATE OR REPLACE SCHEMA external_stages;


// Creating external stage

CREATE OR REPLACE STAGE MANAGE_DB.external_stages.aws_stage
    url='s3://bucketsnowflakes3' -- this is publicly available stage
    credentials=(aws_key_id='ABCD_DUMMY_ID' aws_secret_key='1234abcd_key');


// Description of external stage

DESC STAGE MANAGE_DB.external_stages.aws_stage;


// Alter external stage

ALTER STAGE aws_stage
    SET credentials=(aws_key_id='XYZ_DUMMY_ID' aws_secret_key='987xyz');


// Publicly accessible staging area

CREATE OR REPLACE STAGE MANAGE_DB.external_stages.aws_stage
    url='s3://bucketsnowflakes3';

// List files in stage

LIST @aws_stage; -- for stage we need to put @

//Load data using copy command

COPY INTO OUR_FIRST_DB.PUBLIC.ORDERS
    FROM @aws_stage
    file_format= (type = csv field_delimiter=',' skip_header=1)
    pattern='.*Order.*';
-----------------------------------------------------------------------------------------------------------------------------------------
/*COPY COMMAND*/
-----------------------------------------------------------------------------------------------------------------------------------------
// Creating ORDERS table
CREATE OR REPLACE TABLE OUR_FIRST_DB.PUBLIC.ORDERS (
ORDER_ID VARCHAR(30),
AMOUNT INT,
PROFIT INT,
QUANTITY INT,
CATEGORY VARCHAR(30),
SUBCATEGORY VARCHAR(30));
SELECT * FROM OUR_FIRST_DB.PUBLIC.ORDERS;
// First copy command
COPY INTO OUR_FIRST_DB.PUBLIC.ORDERS
FROM @aws_stage
file_format = (type = csv field_delimiter=',' skip_header=1);
// Copy command with fully qualified stage object
COPY INTO OUR_FIRST_DB.PUBLIC.ORDERS
FROM @MANAGE_DB.external_stages.aws_stage
file_format= (type = csv field_delimiter=',' skip_header=1);
// List files contained in stage
LIST @MANAGE_DB.external_stages.aws_stage;
// Copy command with specified file(s)
COPY INTO OUR_FIRST_DB.PUBLIC.ORDERS
FROM @MANAGE_DB.external_stages.aws_stage
file_format= (type = csv field_delimiter=',' skip_header=1)
files = ('OrderDetails.csv');
// Copy command with pattern for file names
COPY INTO OUR_FIRST_DB.PUBLIC.ORDERS
FROM @MANAGE_DB.external_stages.aws_stage
file_format= (type = csv field_delimiter=',' skip_header=1)
pattern='.*Order.*';Autoincrement Transformation
CREATE OR REPLACE TABLE OUR_FIRST_DB.PUBLIC.ORDERS_EX (
    ORDER_ID number autoincrement start 1 increment 1, --incrementing by 1 starting from 1
    AMOUNT INT,
    PROFIT INT,
    PROFITABLE_FLAG VARCHAR(30)

    );


//Example 5 - Auto increment ID

COPY INTO OUR_FIRST_DB.PUBLIC.ORDERS_EX (PROFIT,AMOUNT)
    FROM (select
            s.$2,
            s.$3
          from @MANAGE_DB.external_stages.aws_stage s)
    file_format= (type = csv field_delimiter=',' skip_header=1)
    files=('OrderDetails.csv');


SELECT * FROM OUR_FIRST_DB.PUBLIC.ORDERS_EX ;


DROP TABLE OUR_FIRST_DB.PUBLIC.ORDERS_EX
When we encounter an error we can handle those errors :
- ON_ERROR = ‘CONTINUE’
- even if there’s an error we can skip those records with the error.
- ON_ERROR = ‘ABORT_STATEMENT’
- as soon as it encounters an error it’ll stop loading
- ON_ERROR = ‘SKIP_FILE’
- if we’re loading 2 files then if one file contains error then it’ll skip that file and goes to next one.
- we can add error limits in this SKIP_FILE_3 → error limit = 3/ SKIP_FILE_30% → error limit will be 30% of the given records.
7. Time travel
- Snowflake Time Travel:
- Access historical data (changed or deleted) within defined period.
- Tasks:
- Restore data-related objects:
- Tables
- Schemas
- Databases
- Duplicate and backup data from key past points.
- Analyze data usage/manipulation over specified periods.
- Restore data-related objects:
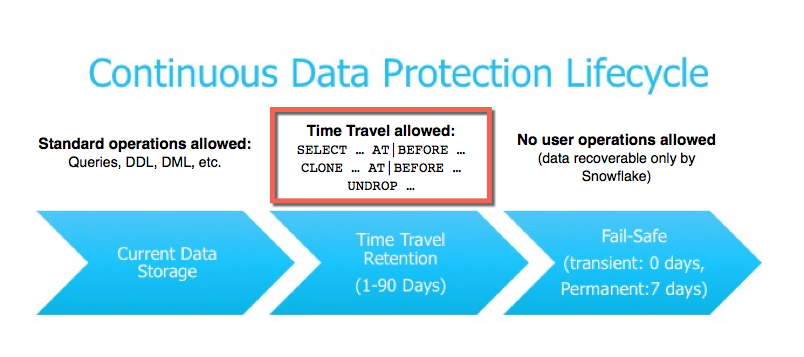
Using Time Travel, you can perform the following actions within a defined period of time:
- Query data in the past that has since been updated or deleted.
- Create clones of entire tables, schemas, and databases at or before specific points in the past.
- Restore tables, schemas, and databases that have been dropped.
Important
After the defined period of time has elapsed, the data is moved into Snowflake Fail-safe and these actions can no longer be performed.
To support Time Travel, the following SQL extensions have been implemented:
-
AT | BEFORE clause which can be specified in SELECT statements and CREATE … CLONE commands (immediately after the object name). The clause uses one of the following parameters to pinpoint the exact historical data you wish to access:
- TIMESTAMP
- OFFSET (time difference in seconds from the present time)
- STATEMENT (identifier for statement, e.g. query ID)
-
UNDROP command for tables, schemas, and databases.
-
Data Retention Period:
- Key component of Snowflake Time Travel.
- Preserves historical data before updates.
- Specifies the duration of preservation.
- ==Standard Retention Period==: 1 day (24 hours).
- Automatically enabled for all Snowflake accounts.
- Snowflake Standard Edition:
- Retention period can be set to 0 (default 1 day).
- Applies at account and object level (databases, schemas, tables).
- Snowflake Enterprise Edition and higher:
- Transient:
- Retention period can be set to 0 (default 1 day).
- Permanent:
- Retention period can be set from 0 to 90 days.
- Transient:
- Note: A retention period of 0 days disables Time Travel for the object.
- End of Retention Period:
- Historical data moves to Snowflake Fail-safe.
- Data becomes unavailable for querying.
- Cloning and restoration of past objects are disabled.
- Setting Retention Period:
- DATA_RETENTION_TIME_IN_DAYS parameter:
- Set by users with ACCOUNTADMIN role.
- Sets default retention period for the account.
- Overrides default when creating database, schema, table.
- MIN_DATA_RETENTION_TIME_IN_DAYS parameter:
- Set by users with ACCOUNTADMIN role.
- Sets minimum retention period for the account.
- Does not alter DATA_RETENTION_TIME_IN_DAYS.
- Effective retention period determined by MAX(DATA_RETENTION_TIME_IN_DAYS, MIN_DATA_RETENTION_TIME_IN_DAYS).
- DATA_RETENTION_TIME_IN_DAYS parameter:
- Retention period can be changed anytime.
Dropped Containers and Object Retention Inheritance
- When a database is dropped:
- Child schemas or tables retain data for the same period as the database.
- Child objects’ retention periods aren’t honored if explicitly set differently.
- Similarly, when a schema is dropped:
- Child tables retain data for the same period as the schema.
- Child tables’ retention periods aren’t honored if explicitly set differently.
- To maintain data retention period for child objects:
- Explicitly drop them before dropping the parent container (database or schema).
Cloning Historical Objects
- AT | BEFORE Clause with CLONE keyword:
- Creates logical duplicate of object at specified historical point.
- Examples:
-
CREATE TABLE:
- Clones table at specified timestamp.
CREATE TABLE restored_table CLONE my_table AT(TIMESTAMP => 'Sat, 09 May 2015 01:01:00 +0300'::timestamp_tz); -
CREATE SCHEMA:
- Clones schema and objects 1 hour before current time.
CREATE SCHEMA restored_schema CLONE my_schema AT(OFFSET => -3600); -
CREATE DATABASE:
- Clones database and objects before specified statement.
CREATE DATABASE restored_db CLONE my_db
  BEFORE(STATEMENT => '8e5d0ca9-005e-44e6-b858-a8f5b37c5726');
-
- Note:
-
Cloning operation for database/schema fails if:
- Time Travel time is beyond retention time of any current child.
- Time Travel time is at or before object creation.
-
Workaround:
-
Use IGNORE TABLES WITH INSUFFICIENT DATA RETENTION parameter to handle purged child objects.
-
See documentation for more details on child objects and data retention time.
-
IGNORE TABLES WITH INSUFFICIENT DATA RETENTION
The following CREATE DATABASE statement creates a clone of a database and all its objects as they existed four days ago, skipping any tables that have a data retention period of less than four days:
CREATE DATABASE restored_db CLONE my_db
AT(TIMESTAMP ⇒ DATEADD(days, -4, current_timestamp)::timestamp_tz)IGNORE TABLES WITH INSUFFICIENT DATA RETENTION;
-
-
Micropartition
In Snowflake, a micropartition is a fundamental unit of data storage and processing. It represents a portion of a table’s data that is stored in a compressed and optimized format for efficient querying and manipulation. Understanding micropartitions is crucial for comprehending Snowflake’s architecture and performance capabilities. Here’s a detailed explanation:
- Storage Organization:
- Snowflake organizes data into micropartitions to optimize storage and query performance.
- Each micropartition typically contains a few hundred to a few million rows of data, depending on the size of the table and the distribution of data within it.
- Micropartitions are stored as immutable files in cloud storage, such as Amazon S3 or Azure Blob Storage.
- Columnar Storage:
- Data within a micropartition is stored in a columnar format rather than a row-based format.
- This columnar storage enables efficient compression and encoding techniques tailored for each column, reducing storage costs and improving query performance.
- Columnar storage also enhances query performance by minimizing the amount of data read from disk during query execution.
- Metadata Management:
- Snowflake maintains extensive metadata about micropartitions, including statistics such as min/max values and null counts for each column.
- This metadata is leveraged by the query optimizer to generate efficient query plans, including partition pruning and predicate pushdown.
- Dynamic Data Organization:
- As data is ingested or modified, Snowflake dynamically manages micropartitions to optimize storage and performance.
- When new data is loaded into a table, Snowflake creates new micropartitions to store the incoming data.
- Similarly, when data is updated or deleted, Snowflake may create new micropartitions to reflect the changes while preserving the original data for Time Travel and data retention purposes.
- Concurrency and Parallelism:
- Snowflake’s architecture allows for concurrent access to micropartitions, enabling high levels of concurrency and parallelism for query processing.
- Queries can efficiently scan and process multiple micropartitions in parallel, leveraging Snowflake’s distributed query processing capabilities.
- Query Optimization:
- Snowflake’s query optimizer takes advantage of micropartition metadata and statistics to generate optimal query plans.
- By understanding the distribution and characteristics of data within micropartitions, Snowflake can optimize query execution strategies, including data skipping, predicate pushdown, and join optimization.
In summary, micropartitions play a critical role in Snowflake’s architecture, enabling efficient storage, processing, and querying of data. They embody Snowflake’s design principles of separation of storage and compute, columnar storage, and dynamic data management. Understanding micropartitions is essential for optimizing performance and scalability in Snowflake data warehouses.
For
permanent table:
Time travel: 1-90 days
Fail safe: 7 days(non-configurable)
transient table:
Time travel: 1 day
Fail safe: 0 days(non-configurable)
temp table:
Time travel: 1 day
Fail safe: 0 days(non-configurable)
example for 3 types time travel
-- scenario - updating product_id to 0
-- before update
select * from sales.orderitem;

select distinct productid from sales.orderitem;-- we've around 77 different productids


update sales.orderitem
set productid = '0'; -- updating to 0

-- after update
select * from sales.orderitem;

select distinct productid from sales.orderitem;

/*
3 types to retrieve the data
1. Query id
2. Timestamp
3. OFFSET - by going back  by minutes/hours
*/

-- 1. Query id
select * from sales.orderitem before (statement => '01b3e255-3201-1045-0008-91ce000244de') limit 20;;

-- we can see old data with query id
select distinct productid from sales.orderitem before (statement => '01b3e255-3201-1045-0008-91ce000244de') ;


create or replace sales.orderitem
select * from sales.orderitem before (statement => '01b3e255-3201-1045-0008-91ce000244de') ;

-- 2. Timestamp

SELECT * FROM sales.orderitem before(TIMESTAMP => '4/24/2024 7:11:31'::TIMESTAMP_TZ);

-- 3. OFFSET - by going back  by minutes/hours
SELECT * FROM sales.orderitem at(OFFSET => -60*20);
8. Types of Table
In Snowflake, tables are fundamental database objects arranged as rows and columns, storing all data. Besides standard tables, Snowflake offers other table types suitable for short-term data storage.
Snowflake provides three table types:
- Permanent Table:
- Standard table type for persistent data storage.
- Data remains available until explicitly deleted or altered.
- Transient Table:
- Designed for temporary data storage.
- Data automatically purged after session completion or a specified time frame.
- Ideal for intermediate results or temporary data processing.
- Temporary Table:
-
Temporary storage for session-specific data.
-
Automatically dropped at session termination.
-
Useful for storing interim data within a session without persistence.
-
Transient Tables
- Persist until explicitly dropped.
- Available to all users with appropriate privileges.
- Designed for transitory data requiring maintenance beyond sessions.
- Lacks Fail-safe period, unlike permanent tables.
- Data Storage Usage:
- Contributes to overall storage charges.
- No Fail-safe costs as transient tables don’t utilize Fail-safe.
- Transient Tables as Clones of Permanent Tables:
- Zero-copy clones created.
- Initially utilize no data storage, sharing micro-partitions with original permanent table.
- Changes to clone result in new micro-partitions exclusive to the clone.
- Deletion of permanent table enters Fail-safe for 7 days, incurring storage costs.
- Transient table clone might delay permanent table’s Fail-safe entry.
- Transient Databases and Schemas:
- Supports creation of transient databases and schemas.
- Tables in transient schema and schemas in transient database are transient.
- Creating Transient Objects:
- Use
TRANSIENTkeyword when creating table, schema, or database. - Example:
CREATE TRANSIENT TABLE mytranstable (id NUMBER, creation_date DATE).
- Use
- Note:
- Transient tables cannot be converted to other table types after creation.
- if the DB is transient then all the child objects are transient too
Temporary Tables
- Used for storing non-permanent, transient data.
- Exists only within the session they were created.
- Data persists only for the session’s duration.
- Not visible to other users or sessions.
- Data purged completely at session end, not recoverable.
- Other objects like stages can also be created as temporary.
- Data Storage Usage:
- Data contributes to storage charges during table existence.
- Explicitly drop tables to avoid unexpected storage costs.
- Exiting the session also prevents additional charges.
- Naming Conflicts:
- Belongs to specified database and schema.
- Not bound by uniqueness requirements.
- Can have same name as non-temporary tables.
- Temp table takes precedence over same-named non-temp tables in session.
- Creating a Temporary Table:
- Use
TEMPORARYkeyword inCREATE TABLE. - No need for
CREATE TABLEprivilege on schema. - Example:
CREATE TEMPORARY TABLE mytemptable (id NUMBER, creation_date DATE).
- Use
Important
Temporary tables cannot be converted to other table types after creation.
Comparison of Table Types
The following table summarizes the differences between the three table types, particularly with regard to their impact on Time Travel and Fail-safe:
| Type | Persistence | Cloning (source type ⇒ target type) | Time Travel Retention Period (Days) | Fail-safe Period (Days) |
| Temporary | Remainder of session | Temporary ⇒ Temporary Temporary ⇒ Transient | 0 or 1 (default is 1) | 0 |
| Transient | Until explicitly dropped | Transient ⇒ Temporary Transient ⇒ Transient | 0 or 1 (default is 1) | 0 |
| Permanent (Standard Edition) | Until explicitly dropped | Permanent ⇒ Temporary Permanent ⇒ Transient Permanent ⇒ Permanent | 0 or 1 (default is 1) | 7 |
| Permanent (Enterprise Edition and higher) | Until explicitly dropped | Permanent ⇒ Temporary Permanent ⇒ Transient Permanent ⇒ Permanent | 0 to 90 (default is configurable) | 7 |
- Time Travel:
- Specify retention period during or after table creation.
- Allows querying, cloning, restoration within retention period.
- Setting retention to 0 for permanent table enters Fail-safe immediately upon dropping.
- Temporary tables retain data for 1 day or session end, whichever is shorter.
- Long Time Travel queries delay purging of temp/transient tables.
- Fail-safe:
- Not configurable for any table type.
- Transient/temp tables have no Fail-safe, no extra storage charges.
- Important:
- Transient tables are cost-effective but data is unrecoverable after retention period.
- Use them for non-critical or reconstructible data.
9. Views
Important
Types of Views
- Snowflake supports two types of views:
- Non-materialized views.
- Materialized views.
- Non-materialized Views:
- Named definition of a query.
- Results generated at query execution, not stored.
- Performance slower than materialized views.
- Common type of view.
- Can be created with various query expressions like selecting columns, specific data ranges, or joining tables.
- Materialized Views:
- Behave more like tables, results stored.
- Faster access but require storage space and maintenance.
- Restrictions compared to non-materialized views.
- See “Working with Materialized Views” for details.
- Secure Views:
- Both non-materialized and materialized views can be defined as secure.
- Advantages include improved data privacy and sharing.
- Performance impacts exist, see “Working with Secure Views” for details.
- Recursive Views (Non-materialized Views Only):
- View can refer to itself (recursive).
- Similar to recursion in recursive CTEs.
For more detailed explanations and examples, refer to respective sections in the Snowflake documentation.
Advantages of Views
- Modular Code:
- Views enable clearer, modular SQL code.
- Example: Hospital database with views for medical and maintenance staff.
- Hierarchies of views can be created.
- Decomposing queries into smaller, understandable pieces.
- Easier debugging by isolating views.
- Promotes code re-use.
- Access Control:
- Views allow granting access to specific data subsets.
- Example: Medical records table; medical and accounting staff access.
- Privileges granted on views rather than underlying tables.
- Enhanced security; roles see only relevant data.
- Secure views offer additional security measures.
- Performance Improvement with Materialized Views:
- Materialized Views designed for performance enhancement.
- Contain copy of subset of table data.
- Faster data scanning compared to tables.
- Support clustering for further performance optimization.
- Multiple materialized views can be created on same data with different clustering.
Overview of Secure Views
- Why Use Secure Views:
- Non-secure views might indirectly expose data due to internal optimizations.
- Secure views prevent such exposure by avoiding these optimizations.
- View definitions in non-secure views are visible to all users, potentially exposing underlying data and structure.
- Secure views restrict visibility to authorized users only.
- When to Use Secure Views:
- Secure views are ideal for protecting sensitive data from unauthorized access.
- Not recommended for views used solely for query convenience, as they may have slower performance than non-secure views.
- Consider the trade-off between data privacy/security and query performance when deciding to use secure views.
- How Data Might be Exposed by a Non-secure View:
- Example Scenario:
- Consider a scenario with a collection of widgets.
- A user has access only to red widgets.
- User queries to check for existence of purple widgets.
- Query includes an expression to identify purple widgets.
- Data Exposure Risk:
- If any purple widgets exist, the expression returns 0, causing a division-by-zero error.
- Error reveals the existence of at least one purple widget.
- This compromises data privacy by inadvertently disclosing information not intended for the user.
- Example Scenario:
Interacting and determining secure views
- Interacting with Secure Views:
- Viewing Secure View Definitions:
- Secure view definitions are accessible only to authorized users.
- Unauthorized users cannot view secure view definitions through commands or interfaces such as:
- SHOW VIEWS and SHOW MATERIALIZED VIEWS commands.
- GET_DDL utility function.
- VIEWS Information Schema view.
- However, users with IMPORTED PRIVILEGES privilege on the SNOWFLAKE database or another shared database can access secure view definitions via the VIEWS Account Usage view.
- Users with ACCOUNTADMIN role or SNOWFLAKE.OBJECT_VIEWER database role also have access to secure view definitions via this view.
- Determining Secure View Status:
- For non-materialized views, the IS_SECURE column in Information Schema and Account Usage views identifies if a view is secure.
- Example queries:
- Information Schema: SELECT table_catalog, table_schema, table_name, is_secure FROM information_schema.views WHERE table_name = ‘MYVIEW’;
- Account Usage: SELECT table_catalog, table_schema, table_name, is_secure FROM snowflake.account_usage.views WHERE table_name = ‘MYVIEW’;
- Alternatively, SHOW VIEWS command can provide similar information.
- Viewing Secure View Details in Query Profile:
- The internals of a secure view are not exposed in Query Profile, even for the view owner.
- This ensures data confidentiality, as non-owners might have access to an owner’s Query Profile.
- Viewing Secure View Definitions:
extra: Best Practices for Using Secure Views
- Sequence-generated Columns:
- Avoid exposing sequence-generated columns in secure views, as they can inadvertently reveal data distribution details.
- Exposing such columns could allow users to deduce sensitive information about underlying data.
- Alternatives include:
- Not exposing sequence-generated columns in views.
- Using randomized identifiers (e.g., UUID_STRING) instead.
- Programmatically obfuscating identifiers to prevent inference of data distribution.
- Scanned Data Size:
- Snowflake does not expose the amount of data scanned for queries involving secure views to protect data privacy.
- However, users might deduce approximate data sizes based on query performance characteristics.
- For enhanced security, consider materializing data per user/role instead of exposing views on base data.
- Secure Views and Data Sharing:
- When using secure views with Secure Data Sharing:
- Use the CURRENT_ACCOUNT function to authorize users from a specific account to access rows in a base table.
- Note: Using CURRENT_ROLE and CURRENT_USER functions with secure views shared to other Snowflake accounts returns NULL values, as the data owner typically doesn’t control users or roles in the recipient account.
- When using secure views with Secure Data Sharing:
-- syntax

CREATE [ OR REPLACE ] [ SECURE ] VIEW <view_name>
[ ( <column_name> [ , ... ] ) ]
AS
10. Namespace
- Namespace in Snowflake:
- In Snowflake, the namespace is represented by the combination of a database and schema (db.schema).
- Objects like tables, views, etc., cannot have the same name within the same namespace.
- Example:
-
Not possible:
db.my_schema.orders (orders as a table) db.my_schema.orders (orders as a view) -
Possible because of different namespaces:
db.my_schema1.orders (orders as a table/view)
-
11. Loading Semi structured Data
https://docs.snowflake.com/en/user-guide/semistructured-concepts
• Data can come from many sources, including applications, sensors, and mobile devices. To support
these diverse data sources, semi-structured data formats have become popular standards for
transporting and storing data.
• Snowflake provides built-in support for importing data from (and exporting data to) the following
semi-structured data formats:
• JSON
• Avro
• ORC
• Parquet
• XML
• Snowflake provides native data types (ARRAY, OBJECT, and VARIANT) for storing semi-structured
data.
What is Semi-structured Data:
- Semi-structured data doesn’t conform to traditional structured data standards but includes tags or markup identifying distinct entities within the data.
- Key Attributes:
- Nested Data Structures: Semi-structured data uses nested structures, unlike structured data represented in flat tables.
- No Fixed Schema: Semi-structured data doesn’t require a prior schema definition and can evolve over time.
- Attribute Variability: Entities within the same class may have different attributes, and attribute order is insignificant.
- Hierarchical Representation: Semi-structured data supports N-level hierarchies of nested information.
What is Hierarchical Data:
- Semi-structured data is typically organized hierarchically, building complex structures by nesting simpler data types.
- Snowflake data types like VARIANT, ARRAY, and OBJECT construct hierarchies for storing semi-structured data.
- Example: Using ARRAY as the outer data type, each cell can contain an OBJECT wrapped in a VARIANT, describing events with key-value pairs.
Loading Semi-structured Data:
- Snowflake imports semi-structured data from JSON, Avro, ORC, Parquet, and XML formats.
- Data can be stored in a single VARIANT column or split into multiple columns based on the structure.
- Users can explicitly specify all, some, or none of the structure while loading data.
- Example Command:
CREATE TABLE my_table (my_variant_column VARIANT); COPY INTO my_table ... FILE FORMAT = (TYPE = 'JSON') ...
Storing Semi-structured Data:
- Semi-structured data is typically stored in ARRAY, OBJECT, and VARIANT Snowflake data types, either individually or nested to build a hierarchy.
- Imported data can be split into multiple columns with simple data types like FLOAT, VARCHAR, etc.
- Snowflake converts data into an optimized internal storage format supporting efficient SQL querying.
Example:
- Each OBJECT describing an event, such as an earthquake or tornado, may have specific keys like ‘Timestamp’, ‘Location’, and ‘Magnitude’ for earthquakes and ‘Timestamp’ and ‘Maximum_wind_speed’ for tornadoes.
- Below is an example JSON structure:
[
 {
 "Event_ID": 54::VARIANT,
 "Type": "Earthquake"::VARIANT,
 "Magnitude": 7.4::VARIANT,
 "Timestamp": "2018-06-09 12:32:15"::TIMESTAMP_LTZ::VARIANT
 ...
 }::VARIANT,
 {
 "Event_ID": 55::VARIANT,
 "Type": "Tornado"::VARIANT,
 "Maximum_wind_speed": 186::VARIANT,
 "Timestamp": "2018-07-01 09:42:55"::TIMESTAMP_LTZ::VARIANT
 ...
 }::VARIANT
]
Querying Semi-structured Data:
- Refer to the provided Snowflake documentation for querying semi-structured data.
Tutorial:
- Snowflake documentation includes a tutorial on JSON basics for further learning.
- Link: Tutorial
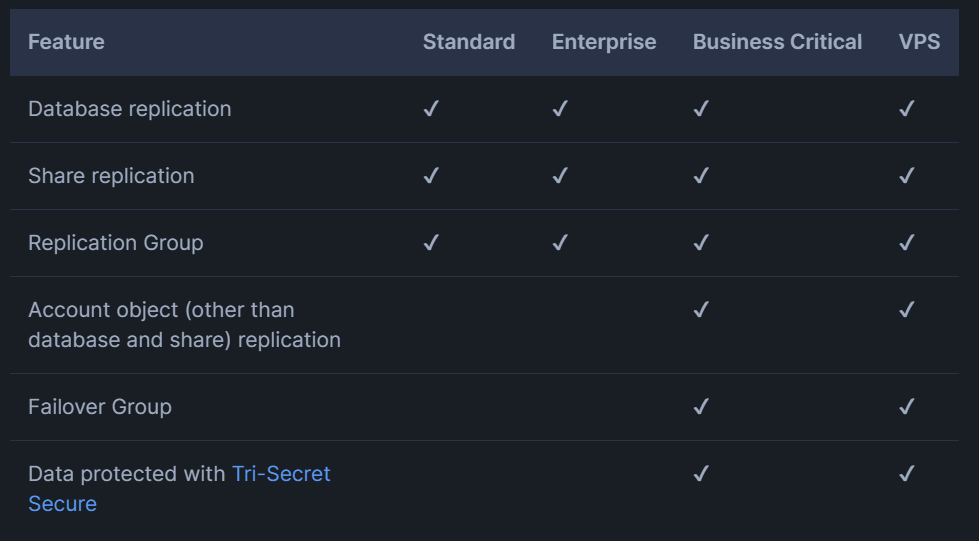
12. Introduction to Business Continuity & Disaster Recovery
- STANDARD & BUSINESS CRITICAL FEATURE
- Database and share replication available to all accounts.
- Replication of other account objects, failover/failback, and Client Redirect require Business Critical (or higher).
- Contact Snowflake Support for upgrading inquiries.
- Features: Replication and Failover/Failback, Client Redirect
- Main Use Cases:
- Planned Failovers: For disaster recovery drills and testing preparedness.
- Unplanned Failovers: In case of region or cloud platform outages.
- Migration: Move Snowflake account to different region or cloud platform.
- Multiple Readable Secondaries: Replicate data to multiple accounts in different regions.
- Account Replication and Failover/Failback Features
- Replication and Failover/Failback:
- Replicate objects with point-in-time consistency using replication group and failover group.
- Failover enables moving account to different region or cloud platform.
- Client Redirect:
- Provides connection URL for Snowflake clients to connect to a different Snowflake account as needed.
- Replication and Failover/Failback:
- Business Continuity and Disaster Recovery
- Massive Outage Scenarios:
- Replicate critical account objects to another Snowflake account in different region.
- Asynchronous replication leads to secondary replicas lagging behind primary objects.
- Options: Recover reads, writes, or both simultaneously based on business needs.
- Region Outage:
- Reads Before Writes:
- Redirect Snowflake clients to read-only replicas for minimal downtime.
- Writes Before Reads:
- Recover failover groups first, redirect Snowflake clients afterward.
- Reads Before Writes:
- Normal Status:
- Replication: Refresh failover groups in region where outage occurred.
- Failback: Promote failover groups in region where outage occurred to primary.
- Client Redirect: Point connection URL to region where outage occurred.
- Massive Outage Scenarios:
- Account Migration
- One-time process of migrating Snowflake objects and data to account in another region or cloud platform.
- Reasons: Closer proximity to user base, preference for different cloud platform.
- Account object replication supports replication of warehouses, users, roles, databases, and shares.
- Note: Requires Business Critical (or higher), can be waived temporarily for one-time account migration.
Replication groups and failover groups
- Replication Group:
- Definition: A defined collection of objects in a source account replicated as a unit to one or more target accounts.
- Access: Provides read-only access for the replicated objects.
- Failover Group:
- Definition: A replication group capable of failover.
- Access: Secondary failover group in a target account offers read-only access for replicated objects. When promoted to primary, read-write access becomes available.
- Promotion: Any target account listed in allowed accounts in a failover group can be promoted to serve as the primary failover group.
- Consistency:
- Point-in-time: Replication and failover groups ensure point-in-time consistency for objects on the target account.
Matrix
13. Overview of Data Loading
Data loading into Snowflake involves several options, primarily utilizing stages to access data files in cloud storage. Here’s a breakdown of the main options available:
Supported File Locations:
Snowflake utilizes stages to refer to the location of data files in cloud storage. The COPY INTO <table> command supports both bulk and continuous data loads, such as Snowpipe, and works with both external and internal stages.
External Stages:
- Supported Cloud Storage Services: Data can be loaded from cloud storage services like Amazon S3, Google Cloud Storage, and Microsoft Azure, regardless of the hosting cloud platform for your Snowflake account.
- Restrictions: Archival cloud storage classes requiring restoration before retrieval, such as Amazon S3 Glacier Flexible Retrieval or Microsoft Azure Archive Storage, are not accessible.
- Operations: Files are uploaded (staged) to your cloud storage account using tools provided by the cloud storage service. Named external stages, created with the
CREATE STAGEcommand, store the URL to files in cloud storage along with access settings and file format options.
Internal Stages:
- User Stage: Each user is allocated a user stage for storing files. These stages are designed for files staged and managed by a single user but can be loaded into multiple tables. User stages cannot be altered or dropped.
- Table Stage: Available for each table in Snowflake, table stages are designed for files managed by one or more users but loaded into a single table. They are implicit stages tied to the respective table and cannot be altered or dropped separately.
- Named Stage: Created as a database object in a schema, named stages can store files managed by multiple users and loaded into multiple tables. These stages offer more control over access privileges and are created using the
CREATE STAGEcommand.
Uploading Files:
Files can be uploaded to any internal stage type from the local file system using the PUT command.
Understanding the options for data loading and the types of stages available helps optimize the process according to your specific use case and requirements.
Bulk Loading Using the COPY Command
Bulk loading with the COPY command allows for efficient loading of data batches from files stored in cloud storage or from local machines to internal Snowflake cloud storage before loading into tables.
Compute Resources:
- User-Provided Virtual Warehouses: Bulk loading relies on virtual warehouses specified in the COPY statement. Users must appropriately size the warehouse to handle expected loads.
Simple Transformations During Load:
Snowflake supports basic data transformations during the loading process using the COPY command, including:
- Column Reordering: The order of columns in the data files does not need to match the target table.
- Column Omission: Columns can be omitted from the data files if they are not needed for the target table.
- Casts: Data types can be cast during the load process to match the target table’s schema.
- Truncating Text Strings: Text strings that exceed the length of the target column can be truncated.
There is no strict requirement for the data files to have the same number and ordering of columns as the target table. Snowflake provides flexibility in mapping data from files to table columns during the loading process.
Choosing an Internal Stage for Local Files
When working with Snowflake, selecting the appropriate internal stage is crucial for efficient data loading. Snowflake supports three types of internal stages:
- User
- Table
- Named
Each type has its own characteristics and limitations, so it’s essential to understand which option best fits your use case.
User Stages:
- Each user is allocated a default stage for storing files.
- Convenient for single-user scenarios but can be copied into multiple tables.
- Referenced using
@~, e.g.,LIST @~. - Cannot be altered or dropped.
- No support for setting file format options; options must be specified in the COPY INTO
<table>command.
Table Stages:
- Each table has a default stage allocated to it.
- Suitable for copying files into a single table but accessible to multiple users.
- Named after the table, referenced using
@%<table_name>. - Implicitly tied to the table object, with no separate privileges.
- Cannot be altered or dropped.
- No support for transforming data during loading.
Named Stages:
- Database objects offering flexibility for data loading.
- Users with appropriate privileges can load data into any table.
- Security/access rules apply, and privileges can be granted or revoked.
- Recommended for regular data loads involving multiple users/tables.
Creating a Named Stage:
You can create a named internal stage using SQL or Snowsight.
Using SQL:
CREATE OR REPLACE STAGE my_stage
FILE_FORMAT = my_csv_format;- Specify a named file format object for the stage.
- No need to specify file format options in subsequent COPY commands.
Using Snowsight:
- Sign in to Snowsight.
- Navigate to Data » Databases.
- Select the desired database and schema.
- Choose Create » Stage » Snowflake Managed.
- Enter a Stage Name and encryption options.
- Complete the stage description fields and click Create.
Using Classic Console:
- Navigate to Databases » Stages.
- Select the database and schema.
- Follow the prompts to create a new stage.
By carefully considering the characteristics of each stage type and creating named stages where appropriate, you can optimize your data loading process in Snowflake.
Staging Data Files from a Local File System
To upload (stage) local data files into an internal stage in Snowflake, you can execute the PUT command using the SnowSQL client or Drivers. Alternatively, if you want to load a few small local data files into a named internal stage, you can use Snowsight.
Staging the Data Files:
- User Stage:
- Example for uploading a file named
data.csvin the/datadirectory on your local machine to your user stage, prefixed with a folder namedstaged.-
Linux or macOS:
PUT file:///data/data.csv @~/staged; -
Windows:
PUT file://C:\\data\\data.csv @~/staged;
-
- Example for uploading a file named
- Table Stage:
- Example for uploading a file named
data.csvin the/datadirectory on your local machine to the stage for a table namedmytable.-
Linux or macOS:
PUT file:///data/data.csv @%mytable; -
Windows:
PUT file://C:\\data\\data.csv @%mytable;
-
- Example for uploading a file named
- Named Stage:
- Example for uploading a file named
data.csvin the/datadirectory on your local machine to a named internal stage calledmy_stage.-
Linux or macOS:
PUT file:///data/data.csv @my_stage; -
Windows:
PUT file://C:\\data\\data.csv @my_stage;
-
- Example for uploading a file named
Listing Staged Data Files:
To see files that have been uploaded to a Snowflake stage, you can use the LIST command:
-
User stage:
LIST @~; -
Table stage:
LIST @%mytable; -
Named stage:
LIST @my_stage;
By executing these commands, you can effectively stage your data files and list them to ensure successful upload. Next, you can proceed with copying data from the internal stage to complete the data loading process.
PUT - to upload files
PUT file://<path_to_file>/<filename> internalStage
    [ PARALLEL = <integer> ]
    [ AUTO_COMPRESS = TRUE | FALSE ]
    [ SOURCE_COMPRESSION = AUTO_DETECT | GZIP | BZ2 | BROTLI | ZSTD | DEFLATE | RAW_DEFLATE | NONE ]
    [ OVERWRITE = TRUE | FALSE ]
Required Parameters:
file://path_to_file/filename: Specifies the URI for the data files on the client machine.internalStage: Specifies the location in Snowflake where to upload the files.
Optional Parameters:
PARALLEL = integer: Specifies the number of threads to use for uploading files.AUTO_COMPRESS = TRUE | FALSE: Specifies whether Snowflake uses gzip to compress files during upload.SOURCE_COMPRESSION = AUTO_DETECT | GZIP | BZ2 | BROTLI | ZSTD | DEFLATE | RAW_DEFLATE | NONE: Specifies the method of compression used on already-compressed files.OVERWRITE = TRUE | FALSE: Specifies whether Snowflake overwrites an existing file with the same name during upload.
Examples:
-
Upload a file named
mydata.csvin the/tmp/datadirectory to an internal stage namedmy_int_stage:PUT file:///tmp/data/mydata.csv @my_int_stage; -
Upload a file named
orders_001.csvin the/tmp/datadirectory to the stage for theorderstiny_exttable, with automatic data compression disabled:PUT file:///tmp/data/orders_001.csv @%orderstiny_ext AUTO_COMPRESS=FALSE; -
Upload multiple files using wildcard characters in the filename pattern:
PUT file:///tmp/data/orders_*01.csv @%orderstiny_ext AUTO_COMPRESS=FALSE; -
Upload a file from a Windows environment, specifying the path with backslashes:
PUT file://C:/temp/data/mydata.csv @~ AUTO_COMPRESS=TRUE; -
Similar to the previous example, but with a path containing spaces, enclosed in single quotes:
PUT 'file://C:/temp/load data/mydata.csv' @~ AUTO_COMPRESS=TRUE;
These examples demonstrate how to use the PUT command to upload data files from a local file system to various internal stages in Snowflake, along with optional parameters for customization.
14. Micro-partitions & data clustering (need to take notes on clustering)
What are Micro-partitions?
- Definition: Micro-partitions are contiguous units of storage in Snowflake tables.
- Size: Each micro-partition typically contains between 50 MB and 500 MB of uncompressed data, but in Snowflake, data is always stored compressed, so the actual size is smaller.
- Storage Format: Data within micro-partitions is organized in a columnar fashion.
- Metadata: Snowflake stores metadata about all rows stored in a micro-partition, including the range of values for each column, the number of distinct values, and additional properties used for optimization and query processing.
Benefits of Micro-partitioning:
- Automatic Derivation: Micro-partitions are automatically created on all Snowflake tables without the need for explicit definition by users.
- Efficient DML and Query Performance: The small size of micro-partitions enables efficient Data Manipulation Language (DML) operations and fine-grained pruning for faster queries.
- Prevention of Skew: Micro-partitions can overlap in their range of values, helping to prevent data skew.
- Columnar Storage: Columns are stored independently within micro-partitions, enabling efficient scanning of individual columns, which improves query performance.
- Compression: Columns are compressed individually within micro-partitions, with Snowflake automatically determining the most efficient compression algorithm for each column.
- Clustering: Clustering keys can be specified for tables to further optimize performance by physically organizing data based on the clustering key.
Impact of Micro-partitions:
- DML Operations: All DML operations take advantage of micro-partition metadata, simplifying table maintenance.
- Column Dropping: When a column is dropped from a table, the micro-partitions containing the data for the dropped column are not rewritten, and the data remains in storage.
- Query Pruning: Micro-partition metadata enables precise pruning of columns at query runtime, improving query performance by scanning only the relevant micro-partitions.
Query Pruning:
- Micro-partition metadata enables precise pruning of columns at query runtime, including columns containing semi-structured data.
- Efficient pruning allows Snowflake to scan only the necessary micro-partitions, improving query performance significantly.
- Sub-second response times for queries within fine-grained ranges, such as one hour or less, are achievable due to efficient pruning.
Limitations:
-
Not all predicate expressions can be used for pruning micro-partitions. For example, Snowflake does not prune micro-partitions based on a predicate with a subquery.
15. Using Dynamic Data Masking
Important
Masking Policies in Snowflake:
- Definition and Purpose:
- Masking policies are schema-level objects in Snowflake designed to protect sensitive data from unauthorized access while allowing authorized users to view it at query runtime.
- They ensure data security without modifying existing data in tables, offering flexibility in data management approaches.
- Flexibility and Management:
- Provide flexibility in centralized, decentralized, or hybrid management approaches.
- Can include conditions and functions to transform data dynamically based on user roles and permissions.
- Support role separation, allowing security teams to define policies independently of object owners.
- Application:
- Applied to tables and views, allowing for consistent application across multiple columns and objects.
- Conditions can be defined using Conditional Expression Functions, Context Functions, or by querying custom entitlement tables.
- Masking functions include built-in functions, User-Defined Functions, or external functions for tokenization.
- Comparison with Secure Views:
- Overcome management challenges posed by secure views, which generate numerous views and dashboards.
- Offer better segregation of duties (SoD) through role separation, unlike secure views.
- Functionality:
- Object owners cannot unset masking policies or view masked data on columns with applied policies.
- Enable Dynamic Data Masking and External Tokenization, with the latter requiring external functions for tokenization operations.
- Syntax and Usage:
- Created using
CREATE MASKING POLICYwith specified input and output data types. - Policies defined using a
CASEstatement to determine masking conditions based on user roles. - Policies can be updated using
ALTER MASKING POLICYwithout unsetting them from columns.
- Created using
- Examples:
-
Dynamic Data Masking Policy:
CREATE MASKING POLICY employee_ssn_mask AS (val string) RETURNS string -> CASE WHEN CURRENT_ROLE() IN ('PAYROLL') THEN val ELSE '******' END; -
External Tokenization Policy:
CREATE MASKING POLICY employee_ssn_detokenize AS (val string) RETURNS string ->
  CASE
    WHEN CURRENT_ROLE() IN ('PAYROLL') THEN ssn_unprotect(VAL)
    ELSE val -- sees tokenized data
  END;
-
- Tip:
- Use
GET_DDLfunction orDESCRIBE MASKING POLICYcommand to view and update existing masking policies.
- Use
Benefits and limitation of data masking and external tokenization
Benefits
The following table compares the benefits of Dynamic Data Masking and External Tokenization.
| Factor | Dynamic Data Masking | External Tokenization | Notes |
| Preserve analytical value after de-identification. | ✔ | Since tokenization provides a unique value for a given set of characters, it is possible to group records by a tokenized value without revealing the sensitive information. For example, group medical records by diagnosis code with the patient diagnosis code tokenized. Data analysts can then query a view on the diagnosis code to obtain a count of the number of patients with a unique diagnosis code. | |
| Pre-load tokenized Data. | ✔ | Unauthorized users never see the real data value. Requires third-party tokenization provider. | |
| Pre-load unmasked data. | ✔ | Only need built-in Snowflake functionality, no third-parties required. | |
| Data Sharing. | ✔ | For details, see Data Sharing (in this topic). | |
| Ease of use and Change management. | ✔ | ✔ | Write a policy once and have it apply to thousands of columns across databases and schemas. |
| Data administration and SoD. | ✔ | ✔ | A security or privacy officer decides which columns to protect, not the object owner. Masking policies are easy to manage and support centralized and decentralized administration models. |
| Data authorization and governance. | ✔ | ✔ | |
| Contextual data access by role or custom entitlements. | ✔ | ✔ | Supports data governance as implemented by security or privacy officers and can prohibit privileged users with the ACCOUNTADMIN or SECURITYADMIN system roles from unnecessarily viewing data. |
| Database replication and account object replication. | ✔ | ✔ | See: Replication (in this topic). |
Limitations
The following table describes the current limitations for Column-level Security. A checkmark (i.e. ✔) indicates a limitation or lack of current support for the feature.
| Limitation | Dynamic Data Masking | External Tokenization | Notes |
| Materialized views (MV). | ✔ | ✔ | For a complete summary, see Materialized views (in this topic). |
| DROP MASKING POLICY | ✔ | ✔ | Prior to dropping a policy, unset the policy from the table or view column using ALTER TABLE … ALTER COLUMN or ALTER VIEW. |
| DROP DATABASE and DROP SCHEMA | ✔ | ✔ | Dropping a database or schema requires the masking policy and its mappings to be self-contained within the database or schema. For example, database_1 contains policy_1 and policy_1 is only used in database_1. |
| External tables. | ✔ | ✔ | An external table cannot be referenced as a lookup table (i.e. in a subquery) to determine whether column values should be masked. For more information, see External Tables (in this topic) |
| Different data types in the input and output of a policy definition. | ✔ | ✔ | A masking policy definition must have the same data type for the input and output. In other words, as a representative example, you cannot define the input datatype as a timestamp and return a string. |
| Masking policy change management. | ✔ | ✔ | You can optionally store and track masking policy changes in a version control system of your choice. |
| Future grants. | ✔ | ✔ | Future grants of privileges on masking policies are not supported. As a workaround, grant the APPLY MASKING POLICY privilege to a custom role to allow that role to apply masking policies on table or view columns. |
INVOKER_ROLE vs CURRENT_ROLE
INVOKER_ROLE and CURRENT_ROLE are both context functions in Snowflake, but they serve slightly different purposes:
**CURRENT_ROLE**: This function returns the name of the role currently active for the session. It reflects the role that the user has assumed for the duration of the session, which may change if the user executes a role switching command (USE ROLE).**INVOKER_ROLE**: This function returns the name of the role that is invoking (executing) the current SQL statement or stored procedure. It reflects the role of the user who initiated the SQL statement or procedure, regardless of whether that user is currently active in the session.
In simpler terms, CURRENT_ROLE tells you the role that the session is currently operating under, while INVOKER_ROLE tells you the role of the user who triggered the execution of the SQL statement or procedure.
Here’s an example to illustrate the difference:
-- Assuming the current role is 'ANALYST'
USE ROLE ANALYST;

-- Define a masking policy
CREATE MASKING POLICY email_mask AS (val string) RETURNS string ->
  CASE
    WHEN INVOKER_ROLE() IN ('ANALYST') THEN val  -- INVOKER_ROLE reflects the role of the user who created the policy
    ELSE '********'
  END;

-- Switch to another role
USE ROLE SUPPORT;

-- Use the masking policy
SELECT email_mask('john.doe@example.com');
In this example, even though the session is operating under the ‘SUPPORT’ role, the INVOKER_ROLE function will reflect the role of the user who defined the masking policy, which is ‘ANALYST’. Therefore, the email address will remain unmasked when evaluated within the context of the ‘ANALYST’ role.
Consideration
These considerations highlight important points to keep in mind when working with masking policies in Snowflake:
- Insertion Caution: When inserting values from a source column with a masking policy to a target column without one, be cautious. If the source column is unmasked for certain roles, those roles can insert unmasked data into the target column. This poses a risk, especially if roles with sufficient privileges can access the target column.
- Preservation of Masking: If roles that see masked data in the source column insert values into a target column, the inserted values will remain masked. This behavior persists even if no masking policy is set on the target column. Consequently, users with enough privileges may encounter a mix of masked and unmasked values in the target column.
- Best Practices:
- Exercise caution when applying masking policies to columns, ensuring that the masking aligns with security and privacy requirements.
- Verify queries using columns with masking policies before granting access to tables and views to users.
- Identify additional tables and views (target columns) where data from the source column may appear, ensuring consistency in masking policies across related objects.
- Setup Script Consideration: When creating setup scripts for Snowflake Native Apps, exercise caution if the masking policy exists in a versioned schema. Detailed considerations are available in Snowflake’s documentation on version schema considerations.
Applying Masking Policies to Columns
- New Table/View:
-
Create a table/view with the desired masking policy using a
CREATE TABLEorCREATE VIEWstatement. -
Example:
-- table
CREATE OR REPLACE TABLE user_info (ssn string masking policy ssn_mask);
-- view
CREATE OR REPLACE VIEW user_info_v (ssn masking policy ssn_mask_v) AS SELECT * FROM user_info;
-
- Existing Table/View:
-
Apply the masking policy to an existing table/view column using an
ALTER TABLEorALTER VIEWstatement. -
Example:
-- table
ALTER TABLE IF EXISTS user_info MODIFY COLUMN ssn_number SET MASKING POLICY ssn_mask;
-- view
ALTER VIEW user_info_v MODIFY COLUMN ssn_number SET MASKING POLICY ssn_mask_v;
-
Applying Conditional Masking Policy on a Column
- New Table/View:
-
Set the policy on a table/view column using the corresponding
CREATEstatement. -
Example:
-- table
CREATE OR REPLACE TABLE user_info (email string masking policy email_visibility) USING (email, visibility);
-- view
CREATE OR REPLACE VIEW user_info_v (email masking policy email_visibility) USING (email, visibility) AS SELECT * FROM user_info;
-
- Existing Table/View:
-
Set the policy on a table/view column using the corresponding
ALTERstatement. -
Example:
-- table
ALTER TABLE IF EXISTS user_info MODIFY COLUMN email SET MASKING POLICY email_visibility USING (EMAIL, VISIBILITY);
-- VIEW
ALTER VIEW user_info_v MODIFY COLUMN email SET MASKING POLICY email_visibility USING (email, visibility);
-
Replacing a Masking Policy on a Column
- Two approaches:
-
Unset the existing policy and then set a new one.
ALTER TABLE t1 MODIFY COLUMN c1 UNSET MASKING POLICY; ALTER TABLE t1 MODIFY COLUMN c1 SET MASKING POLICY p2; -
Use the
FORCEkeyword to replace the policy in a single statement.ALTER TABLE t1 MODIFY COLUMN c1 SET MASKING POLICY p2 FORCE;
-
- Important Considerations:
- Exercise caution when replacing a masking policy.
- Timing of replacement and queries on the column may affect data protection.
- Coordinate with data administrators before replacing policies to ensure data security.
Materialized Views, Obtaining Columns with a Masking Policy, External Tables, Streams, Cloned Objects, CTAS
Materialized Views
Snowflake permits the application of masking policies to materialized view columns. During query execution, the system applies any existing masking policies before creating the materialized view rewrite. Once the materialized view is rewritten, it becomes impossible to set masking policies on any of its columns.
- Setting Policies:
- For new materialized views, use
CREATE MATERIALIZED VIEWstatement. - For existing materialized views, employ
ALTER VIEW … MODIFY COLUMNstatement.
- For new materialized views, use
CREATE OR REPLACE MATERIALIZED VIEW user_info_mv
  (ssn_number masking policy ssn_mask)
AS SELECT ssn_number FROM user_info;- Limitations:
- If a materialized view exists on a table, you cannot set a masking policy on its columns.
- Attempting to include columns with existing masking policies in a materialized view raises an error.
Obtaining Columns with a Masking Policy
- Use
POLICY_REFERENCESfunction fromINFORMATION_SCHEMAto retrieve columns with masking policies.
SELECT * from table(
  INFORMATION_SCHEMA.POLICY_REFERENCES(
    policy_name=>'<policy_name>'
  )
);- Execute
DESCRIBE TABLEorDESCRIBE VIEWto view masking policy on columns.
Object Tagging and Masking Policies
- Refer to Tag-based masking policies documentation.
- Note: Directly assigned column masking policies take precedence over tag-based ones.
Hashing, Cryptographic, and Encryption Functions
- These functions can be used in masking policies for sensitive data.
- For detailed usage, refer to Advanced Column-level Security topics.
External Tables
- Assigning Policies:
- Cannot assign masking policy to
VALUEcolumn inCREATE EXTERNAL TABLE. - Use
ALTER TABLE … ALTER COLUMNstatement for this purpose.
- Cannot assign masking policy to
ALTER TABLE t1 MODIFY COLUMN VALUE SET MASKING POLICY p1;- Virtual Columns:
- Set
EXEMPT_OTHER_POLICIESproperty in masking policy ofVALUEcolumn to apply different policy on virtual column.
- Set
Streams
- Masking policies on table columns extend to streams on the same table.
Cloned Objects
- Policy Cloning:
- Cloning a schema includes all policies within it.
- Cloned table inherits policies from the source table.
CREATE TABLE … AS SELECT (CTAS) Statements
- Applies masking policies on included columns before populating data in the new table.
- Use a role with access to unmasked data to create the new table and then apply masking policies afterward.
UDFs, Data Sharing Considerations, limitations, External Functions and Replication, Query Profile and Unload Data
Masking Sensitive Data
- You can use aggregate functions (e.g., COUNT) on masked data columns.
- This allows data analysts to get summary information without seeing the actual data.
How it Works
- Create a View: The table owner creates a view containing the aggregate function (e.g.,
SELECT DISTINCT(ssn) FROM table1). - Grant Permissions: Grant the
ANALYSTrole full privileges on the view (not the table). - Apply Masking Policy: Apply a masking policy to the table column. This policy determines what authorized users see (e.g., PAYROLL role sees real data, others see masked data).
Example: Counting Social Security Numbers
- We want to count the number of distinct social security numbers (SSNs) without revealing the actual numbers.
- Create a view
ssn_countthat usesCOUNT(DISTINCT ssn). - Grant the
ANALYSTrole access to the view. - Apply a masking policy to the SSN column that shows
**MASKED***for unauthorized users.
User-defined Functions (UDFs) in Masking Policies
- You can use UDFs in masking policy conditions.
- Ensure the data types of the table column, UDF, and masking policy match to avoid errors.
Data Sharing Considerations
- When sharing tables/views with masking policies, Snowflake returns
NULLfor functions likeCURRENT_ROLEor secure UDFs in the consumer account. - Use
CURRENT_ACCOUNTorIS_DATABASE_ROLE_IN_SESSION(with shared role) as a workaround.
Limitations
- Data sharing providers cannot create policies in reader accounts.
- Consumers cannot apply policies to shared tables/views (workaround: import and create local view).
- Consumers cannot query shared tables referencing tables from different providers with access control policies.
External Functions and Replication
- Snowflake returns errors when using external functions with shared tables/views or replicating databases with dangling references to masking policies.
- Business Critical Edition or higher is required for failover/failback with masking policies.
Query Profile and Unload Data
EXPLAINshows masked data, not the masking policy body.COPY INTOapplies the masking policy, resulting in masked data for unauthorized users.
Snowflake Native App Framework
- Refer to documentation for details on using masking policies with Snowflake Native Apps.
Masking policy privileges
| Policy Action | Centralized Management | Hybrid Management | Decentralized Management |
| Create policies | Security officer | Security officer | Individual teams |
| Apply policies to columns | Security officer | Individual teams | Individual teams |
-
Centralized Management:
- Policy Creation: Handled by a designated security officer role.
- Policy Application: Also managed by the security officer.
- Advantages: Ensures consistency and centralized control over policy creation and application.
- Considerations: May require a dedicated team or role for policy management.
-
Hybrid Management:
- Policy Creation: Handled by a security officer, but application is decentralized.
- Policy Application: Applied by individual teams or departments.
- Advantages: Combines centralized policy creation with decentralized application, allowing for flexibility.
- Considerations: Requires coordination between the security officer and individual teams.
-
Decentralized Management:
- Policy Creation: Each team or department manages its own policy creation.
- Policy Application: Policies are created and applied by individual teams.
- Advantages: Provides autonomy to individual teams but may lead to inconsistency.
- Considerations: Requires each team to have the necessary expertise and responsibility for policy management.
-
Choosing an Approach:
-
Snowflake recommends involving all relevant stakeholders to determine the best approach.
-
Consider factors such as organizational structure, resource availability, and the level of control desired over data masking policies.
-
Each approach has its own advantages and considerations, so it’s important to align with organizational goals and requirements.
-
-
Masking Policy Privileges:
- Snowflake provides several privileges for managing Column-level Security masking policies.
- These privileges include CREATE, APPLY, and OWNERSHIP.
- The APPLY privilege allows executing unset and set operations for a masking policy on a column.
- The OWNERSHIP privilege grants full control over the masking policy.
| Privilege | Usage |
| CREATE | Enables creating a new masking policy in a schema. |
| APPLY | Enables executing the unset and set operations for a masking policy on a column. Note that granting the global APPLY MASKING POLICY privilege (i.e. APPLY MASKING POLICY on ACCOUNT) enables executing the DESCRIBE operation on tables and views. For syntax examples, see Masking policy privileges. |
| OWNERSHIP | Grants full control over the masking policy. Required to alter most properties of a masking policy. Only a single role can hold this privilege on a specific object |
- Centralized Management:
-
In a centralized approach, a security officer role creates and applies masking policies.
-
Example:
-- Create a security_officer custom role
USE ROLE ACCOUNTADMIN;
CREATE ROLE security_officer;

-- Grant CREATE and APPLY masking policy privileges
GRANT CREATE MASKING POLICY ON SCHEMA mydb.mysch TO ROLE security_officer;
GRANT APPLY MASKING POLICY ON ACCOUNT TO ROLE security_officer;
-
- Hybrid Management:
-
In a hybrid approach, the security officer role creates policies, while individual teams apply them.
-
Example:
USE ROLE ACCOUNTADMIN;
CREATE ROLE security_officer;
GRANT CREATE MASKING POLICY ON SCHEMA mydb.mysch TO ROLE security_officer;
-
- Decentralized Approach:
-
In a decentralized approach, individual teams create and apply masking policies.
-
Example:
USE ROLE ACCOUNTADMIN;
GRANT CREATE MASKING POLICY ON SCHEMA mydb.mysch TO ROLE support;
GRANT CREATE MASKING POLICY ON SCHEMA <DB_NAME.SCHEMA_NAME> TO ROLE FINANCE;
-
- Granting Privileges:
-
Granting the APPLY privilege decentralizes unset and set operations to object owners.
-
Example:
-- Grant APPLY privilege to a specific role
USE ROLE security_officer;
GRANT APPLY ON MASKING POLICY ssn_mask TO ROLE human_resources;
-
- Additional Information:
-
Privileges must be managed carefully to ensure consistent masking policy application and data security.
-
Different management approaches have varying levels of consistency and responsibility.
-
See documentation for more on masking policy privileges, including usage examples and best practices.
-
Masking policy DDL
| Operation | Privilege |
| Create masking policy | A role with the CREATE MASKING POLICY on SCHEMA privilege. |
| Alter masking policy | The masking policy owner (i.e. the role with the OWNERSHIP privilege on the masking policy). |
| Drop masking policy | The masking policy owner (i.e. the role with the OWNERSHIP privilege on the masking policy). |
| Show masking policies | One of the following: A role with the global APPLY MASKING POLICY privilege, or The masking policy owner (i.e. the role with the OWNERSHIP privilege on the masking policy) or A role with the APPLY privilege on the masking policy. |
| Describe masking policy | One of the following: A role with the global APPLY MASKING POLICY privilege or The masking policy owner (i.e. the role with the OWNERSHIP privilege on the masking policy) or A role with the APPLY privilege on the masking policy. |
| List of columns having a masking policy | One of the following: The role with the APPLY MASKING POLICY privilege, or The role with the APPLY on MASKING POLICY privilege on a given masking policy and has OWNERSHIP on the target object. |
| Using UDFs in a masking policy | If creating a new or altering an existing masking policy, the policy administrator role must have usage on the UDF, all scalar UDFs in the policy expression should have the same data type, and the UDF must exist. At the query runtime, Snowflake verifies if the UDF exists; if not, the SQL expression will not resolve and the query fails. |
SQL Queries for Monitoring Masking Policies
Discover Masking Policies:
-
Use the
MASKING_POLICIESview in theACCOUNT_USAGEschema of the sharedSNOWFLAKEdatabase to list all masking policies in your Snowflake account.SELECT * FROM SNOWFLAKE.ACCOUNT_USAGE.MASKING_POLICIES ORDER BY POLICY_NAME;
Identify Assignments:
-
Account-level query: Use the
POLICY_REFERENCESview in theACCOUNT_USAGEschema to determine all columns with masking policies.SELECT * FROM SNOWFLAKE.ACCOUNT_USAGE.POLICY_REFERENCES ORDER BY POLICY_NAME, REF_COLUMN_NAME; -
Database-level query: Utilize the
POLICY_REFERENCEStable function in the Information Schema to identify masking policies on columns for a specific table.SELECT * FROM TABLE( my_db.INFORMATION_SCHEMA.POLICY_REFERENCES( 'my_table', 'table' ) );
Monitoring Masking Policies with Snowsight:
Accessing Governance Area:
- Navigate to the Governance area in Snowsight, which requires an Enterprise Edition or higher.
- Ensure your account role has either the
GOVERNANCE_VIEWERandOBJECT_VIEWERdatabase roles directly granted or leverage theACCOUNTADMINrole.
Dashboard Interface:
- Provides insights into tag and policy usage, covering count, percentage, and prevalence.
- Allows tracking of how well data is protected and tagged.
- Clicking on count numbers or policy/tag names opens the Tagged Objects interface.
Tagged Objects Interface:
- Associates coverage and prevalence with specific tables, views, or columns.
- Enables filtering by tags or policies to quickly identify assignments.
- Provides troubleshooting capabilities for policy errors and SQL error messages.
Tip:
- Use Snowsight to troubleshoot masking policy assignments, identifying conflicts or errors.
- Leverage the Data Preview tab for error messages and corrections in policy assignments.
By employing these SQL queries and Snowsight features, you can effectively monitor and manage masking policies in Snowflake.
Tag-based Masking Policies
- Overview:
- Combines object tagging and masking policy features.
- Simplifies data protection by applying masking policies to tagged columns automatically.
- Can be set on database, schema, or table.
- Supports one masking policy per data type for each tag.
- Masking policy conditions can be based on the tag’s policy or tag string value.
- Choose Assignment Level:
- Data engineers and stewards can assign tag-based policies to databases, schemas, tables, or columns.
- Database & Schema:
- Protects table and view columns in the schema or database based on tag lineage.
- Newly added columns are automatically protected if their data type matches the policy.
- Tables:
- Tag applies to all columns in the table.
- Directly assigned masking policy takes precedence over tag-based policy if both exist.
- Benefits:
- Ease of Use: Simplifies policy management.
- Scalable: Reduces manual effort for policy assignment.
- Comprehensive: Protects all columns with matching data types.
- Future-proofing: Applies policy to new columns automatically.
Considerations: Tag-Based Masking Policies
- Cloning Schema:
- If tag and masking policy are in different schemas:
- Cloned table is protected by masking policy in the source schema, not the cloned schema.
- If tag, masking policy, and table are in the same schema:
- Cloned table is protected by masking policy in the cloned schema, not the source schema.
- If tag and masking policy are in different schemas:
- Table Cloning or Movement:
- If table protected by tag-based policy is cloned or moved:
- Inherited policy changes based on target schema or database.
- Protected by policy in target schema or database if available.
- If table protected by tag-based policy is cloned or moved:
- Replication:
- Replication considerations exist for tag-based masking policies.
- For details, refer to policy replication considerations.
- Secure Data Sharing:
- Integration with Secure Data Sharing for data protection.
- Refer to “Masking Policies & Data Sharing” and “Object Tagging & Data Sharing” for details.
Limitations
- Data Types:
- Each tag supports only one masking policy per data type.
- Example: Multiple masking policies for the same data type not allowed on a single tag.
- System Tags:
- Masking policies cannot be assigned to system tags.
- Dropping Objects:
- Neither masking policy nor tag can be dropped if policy is assigned to a tag.
- Parent schema and database containing tag and policy cannot be dropped if policy is assigned to a tag.
- Materialized Views:
- Materialized views cannot be created on tables protected by tag-based masking policies.
- Adding tag-based masking policy to underlying table invalidates existing materialized views.
- Row Access Policies:
- A column cannot be specified in both masking policy and row access policy simultaneously.
- Conditional Columns:
- Masked columns cannot be used as conditional columns in a masking policy.
- Mapping Tables:
- Tables with columns protected by tag-based masking policies cannot be used as mapping tables.
- Snowflake Native App Framework:
- Restrictions exist on using tag-based masking policies with Snowflake Native App.
- Details include limitations on sharing data content containing policies and defining policies on proxy views.
Note: Requires Snowflake Enterprise Edition.
extra
Notes on Managing Tag-Based Masking Policies:
Privileges:
- Different privilege requirements based on setting the tag-based masking policy on a database, schema, or table.
- Option 1: Role needs both global APPLY MASKING POLICY and APPLY TAG privileges.
- Option 2: Schema owner needs global APPLY MASKING POLICY and APPLY privilege on the tag.
- For tables and views, role with global APPLY MASKING POLICY privilege can assign and replace masking policy on a tag.
Assigning a Masking Policy to a Tag:
- Procedure similar to setting a tag-based masking policy on a table.
- Create tag, masking policy, and set policy on tag.
- Assign tag to object (database, schema, table).
Replace a Masking Policy on a Tag:
- Two options: unset policy then set new policy, or use FORCE keyword.
- Caution advised due to potential data leaks or access issues.
Update a Tag Value:
- Schema owner cannot change tag value if policy set by different role.
- Solution involves unsetting policy, modifying tag value, and reassigning policy.
Parent Database and Schema:
- Limitations on DROP and REPLACE operations when tag and policy in same schema, but table in different schema.
Conditional Arguments:
- Conditional masking policy can be assigned to a tag.
- Query fails if table lacks column matching conditional argument or if data types mismatch.
Tag Lineage:
- Tag with masking policy assigned to base table or column.
- Policy protects base table columns, so derived view columns also protected.
Data Sharing:
- Tag-based masking policies enforced in consumer account for shared data.
- Tag lineage preserved in consumer account.
Snowsight:
- Monitoring and assigning tag-based masking policies in Snowsight available.
Usage Examples:
- Common procedure involves creating tags, masking policies, assigning policies to tags, and applying tags to objects.
- Prerequisite steps involve identifying existing tags, policies, and planning protection strategy.
- Common assumptions made for examples regarding roles and privileges.
Examples Summary:
- Protect column data directly assigned to tag.
- Protect column data based on column tag string value.
- Protect table based on table tag string value.
Important
- High-level Steps:
- Grant masking policy management privileges.
- Grant the custom role to users.
- Create and define masking policies.
- Execute queries in Snowflake.
- Step 1: Grant masking policy privileges to custom role:
-
Create
MASKING_ADMINrole. -
Grant privileges to
MASKING_ADMINrole.use role useradmin; CREATE ROLE masking_admin; use role securityadmin; GRANT CREATE MASKING POLICY on SCHEMA <db_name.schema_name> to ROLE masking_admin; GRANT APPLY MASKING POLICY on ACCOUNT to ROLE masking_admin;
-
- Step 2: Grant the custom role to a user:
-
Grant
MASKING_ADMINrole to a user (e.g.,jsmith).GRANT ROLE masking_admin TO USER jsmith;
-
- Step 3: Create a masking policy:
-
Define a masking policy (e.g.,
email_mask) based on role permissions.CREATE OR REPLACE MASKING POLICY email_mask AS (val string) RETURNS string -> CASE WHEN CURRENT_ROLE() IN ('ANALYST') THEN val ELSE '*********' END;
-
- Step 4: Apply the masking policy to a table or view column:
-
Apply the masking policy to a table column or a view column.
ALTER TABLE IF EXISTS user_info MODIFY COLUMN email SET MASKING POLICY email_mask;
ALTER VIEW user_info_v MODIFY COLUMN email SET MASKING POLICY email_mask;
-
- Step 5: Query data in Snowflake:
-
Execute queries with different roles to verify the masking policy’s effect.
-- Using the ANALYST role
USE ROLE analyst;
SELECT email FROM user_info; -- should see plain text value

-- Using the PUBLIC role
USE ROLE PUBLIC;
SELECT email FROM user_info; -- should see full data mask
-
Masking Policy with a Memoizable Function
- Objective: Implement a masking policy using a memoizable function to control access to Personally Identifiable Information (PII) data in Snowflake.
- Scenario Overview:
- PII Data Table:
employee_datacontains sensitive information likeIDandPHONE_NUMBER. - Mapping Table:
auth_role_tdetermines roles authorized to access data.
- PII Data Table:
- Steps to Implement Masking Policy:
-
Create Memoizable Function:
CREATE FUNCTION is_role_authorized(arg1 VARCHAR) RETURNS BOOLEAN MEMOIZABLE AS $$ SELECT ARRAY_CONTAINS( arg1::VARIANT, (SELECT ARRAY_AGG(role) FROM auth_role WHERE is_authorized = TRUE) ) $$; -
Call Memoizable Function:
SELECT is_role_authorized(IT_ADMIN); -
Define Masking Policy:
CREATE OR REPLACE MASKING POLICY empl_id_mem_mask AS (val VARCHAR) RETURNS VARCHAR -> CASE WHEN is_role_authorized(CURRENT_ROLE()) THEN val ELSE NULL END; -
Apply Masking Policy:
ALTER TABLE employee_data MODIFY COLUMN id SET MASKING POLICY empl_id_mem_mask; -
Test Masking Policy:
USE ROLE data_engineer;
SELECT * FROM employee_data;
-
Conclusion: By employing memoizable functions and masking policies, Snowflake enables controlled access to sensitive data, ensuring compliance and data security.
Additional Masking Policy Examples
- Objective: Provide various examples of masking policies for Dynamic Data Masking in Snowflake.
- Examples:
-
Allow Unmasked Values for Production Account:
- Allows production account to view unmasked values while others see masked values.
case when current_account() in ('<prod_account_identifier>') then val else '*********' end; -
Return NULL for Unauthorized Users:
- Masks data by returning NULL for unauthorized users.
case when current_role() IN ('ANALYST') then val else NULL end; -
Static Masked Value for Unauthorized Users:
- Provides a static masked value for unauthorized users.
CASE WHEN current_role() IN ('ANALYST') THEN val ELSE '********' END; -
Hash Value for Unauthorized Users:
- Masks data by returning a hash value using SHA2 for unauthorized users.
CASE WHEN current_role() IN ('ANALYST') THEN val ELSE sha2(val) END; -
Partial or Full Masking:
- Applies partial or full masking based on user roles.
CASE WHEN current_role() IN ('ANALYST') THEN val WHEN current_role() IN ('SUPPORT') THEN regexp_replace(val,'.+\\@','*****@') ELSE '********' END; -
Masking with Timestamps:
- Masks data using timestamps for specific roles.
case WHEN current_role() in ('SUPPORT') THEN val else date_from_parts(0001, 01, 01)::timestamp_ntz end; -
Using User-Defined Functions (UDF):
- Masks data using custom UDFs based on user roles.
CASE WHEN current_role() IN ('ANALYST') THEN val ELSE mask_udf(val) END; -
Masking Variant Data:
- Masks data within variant data type.
CASE WHEN current_role() IN ('ANALYST') THEN val ELSE OBJECT_INSERT(val, 'USER_IPADDRESS', '****', true) END; -
Using a Custom Entitlement Table:
- Masks data based on entitlements stored in a custom table.
CASE WHEN EXISTS (SELECT role FROM <db>.<schema>.entitlement WHERE mask_method='unmask' AND role = current_role()) THEN val ELSE '********' END; -
Decrypting Previously Encrypted Data:
- Decrypts previously encrypted data for authorized users.
case when current_role() in ('ANALYST') then DECRYPT(val, $passphrase) else val end; -
Using JavaScript UDF on JSON (VARIANT):
- Masks location data in a JSON string using a JavaScript UDF.
- Important to set data type as VARIANT in both UDF and masking policy.
-- JavaScript UDF definition and usage -
Using the GEOGRAPHY Data Type:
- Masks GEOGRAPHY data by converting to a fixed point for unauthorized users.
-- Masking policy using TO_GEOGRAPHY function
- Important Notes:
-
Snowflake does not support different input and output data types in a masking policy.
-
Workaround involves casting actual timestamp value with a fabricated timestamp value.
-
16. Row
17. Introduction to Secure Data Sharing
- Overview:
- Secure Data Sharing facilitates sharing selected objects in a database with other Snowflake accounts.
- Shared objects include databases, tables, dynamic tables, external tables, Iceberg tables, secure views, secure materialized views, and secure user-defined functions (UDFs).
- Key Points:
- Shared objects are read-only and cannot be modified or deleted, including table data.
- Data sharing does not involve copying or transferring data between accounts.
- Sharing uses Snowflake’s services layer and metadata store, not contributing to storage charges in consumer accounts.
- Consumers are only charged for compute resources used to query shared data.
- How Secure Data Sharing Works:
- Sharing is quick and easy for providers and provides near-instantaneous access for consumers.
- Providers create shares of databases in their accounts and grant access to specific objects.
- Multiple accounts, including the provider’s own accounts, can be added to the share.
- Consumers create read-only databases from the share, with access configurable through standard role-based access control.
- Provider-Consumer Relationship:
- Providers create shares and offer them to consumers.
- Consumers access shared data by creating databases from the offered shares.
- Types of Sharing:
- Listing: Offers a share and additional metadata as a data product to one or more accounts.
- Direct Share: Directly shares specific database objects to another account in the same region.
- Data Exchange: Sets up and manages a group of accounts to offer a share to that group.
- Direct shares can be converted to listings.
- Data Provider and Consumer Roles:
- Providers create shares and offer them to consumers.
- Consumers create databases from offered shares to access shared data.
- Usage Metrics and Monitoring:
- Providers have access to usage metrics of their listings, including consumer usage and accessing accounts.
- Reader Accounts for Third-Party Access:
- Reader accounts provide a way to share data with non-Snowflake customers.
- Each reader account belongs to the provider account and can only consume data from it.
- Reader accounts can query shared data but cannot perform DML tasks like data loading or manipulation.
Sharing with Listings
- Overview:
- Listings offer an enhanced method of Secure Data Sharing, enabling Snowflake users to share data and access shared data with additional features.
- Providers can share Snowflake Native Apps or data from their Snowflake account by creating and publishing listings.
- Consumers can access shared data from other Snowflake accounts via listings on the Snowflake Marketplace or privately.
- What is a Listing?:
- A listing follows the provider-consumer model of Secure Data Sharing.
- Providers can offer shares publicly on the Snowflake Marketplace or privately to specific consumers.
- Consumers can access listings for free, via limited trial, or through paid access.
- Listing Capabilities:
- Listings offer features such as charging consumers for access, monitoring usage, and providing metadata about the shared data.
- Providers can offer metadata like title, description, sample SQL queries, and data provider information.
- Listing Availability Options:
- Listings can be offered privately to specific consumers or publicly on the Snowflake Marketplace.
- Public listings on the marketplace allow providers to share curated data offerings with multiple consumers simultaneously.
- Listing Access Options:
- Consumers can access listings for free, through limited trial access, or via paid access.
- Free listings provide instant access to a full dataset, best for generic or non-customer-specific data.
- Limited trial listings offer limited access, with full access available upon request, suitable for customer-specific data.
- Paid listings allow providers to charge consumers for access to their data products.
- Types of Listings:
- Free Listings: Available privately or on the Snowflake Marketplace, offering instant access to a full dataset.
- Limited Trial Listings: Offer limited access to data products on the marketplace, with full access available upon request.
- Paid Listings: Available privately or on the marketplace, allowing providers to charge consumers for access to data products.
- Best Use Cases for Paid Listings:
- Paid listings are suitable for proprietary or industry-specific data, insights, or analytics.
- They offer unified procurement through Snowflake, enabling consumers to try and buy data products seamlessly.
Snowflake Marketplace
- Overview:
- The Snowflake Marketplace serves as a platform for exploring, accessing, and providing listings to consumers within the Snowflake Data Cloud.
- Purpose:
- Allows users to discover and access third-party data and services.
- Enables providers to market their own data products across the Snowflake Data Cloud.
- Features:
- Providers can share curated data offerings with multiple consumers simultaneously via listings.
- Paid listings allow providers to charge for their data products.
- Use Cases for Consumers:
- Access historical data for research, forecasting, and machine learning.
- Utilize up-to-date streaming data like current weather and traffic conditions.
- Leverage specialized identity data for understanding subscribers and audience targets.
- Gain new insights from diverse sources of data.
- Availability:
- Accessible globally to all non-VPS Snowflake accounts hosted on AWS, GCP, and Azure (excluding Azure Government, with support planned).
- Marketplace Capabilities:
- For Providers:
- Publish free-to-use datasets to attract interest and new opportunities.
- Share datasets with samples that can be customized for specific consumers.
- Securely share live datasets in real-time without data duplication or integration tasks.
- Eliminate costs associated with building and maintaining APIs and data pipelines.
- For Consumers:
- Discover and test third-party data sources.
- Access raw data products from vendors seamlessly.
- Combine new datasets with existing data in Snowflake for deriving insights.
- Instantly access and continually receive updated datasets.
- Reduce costs related to building and maintaining various APIs and data pipelines.
- Utilize preferred business intelligence (BI) tools.
- For Providers:
- Further Resources:
- Providers: Refer to “Becoming a provider of listings” and “Creating and publishing a listing”.
- Consumers: Refer to “Becoming a consumer of listings” and “Exploring listings” for more information.
Snowflake Data Clean Rooms
- Overview:
- Snowflake Data Clean Rooms are a native solution facilitating the construction, connectivity, and utilization of data clean rooms within the Snowflake environment.
- About Data Clean Rooms:
- Data clean rooms provide a secure framework for generating insights while safeguarding sensitive information.
- They enable the combination and analysis of data from various sources without compromising data privacy.
- Benefits:
- Enhanced privacy by protecting sensitive data during collaboration.
- Deeper insights through the amalgamation of data from multiple sources.
- Increased security by minimizing the risk of unauthorized access.
- Functionality:
- All analyses occur within the secure environment of the clean room, ensuring that collaborators cannot directly query raw data.
- Providers can define permitted analyses, allowing them to control how their data is utilized.
- Privacy-Enhancing Techniques:
- Differential privacy adds noise to results to prevent individual identification.
- Encryption is applied to data, followed by multi-party computations on the encrypted data.
- Clean Room Collaborators:
- Providers: Create, configure, and share clean rooms, as well as add data to them.
- Consumers: Install clean rooms, add datasets, and analyze data within them, including joining their own data with the provider’s.
- Managed Accounts for Non-Snowflake Customers:
- Providers can collaborate with consumers without Snowflake accounts by inviting them to use a managed account within the clean room environment.
- Managed accounts exist in the same cloud platform and region as the provider’s account and can be converted to Snowflake accounts if desired.
- Working with Snowflake Data Clean Rooms:
- Two options are available: Web app and Developer APIs.
- Web App: User-friendly interface for business and non-technical users, offering pre-defined analysis templates.
- Developer APIs: Complete set of APIs for technical users to work programmatically with clean rooms, including custom application development.
- Two options are available: Web app and Developer APIs.
- Available Regions:
- Snowflake Data Clean Rooms are accessible in select regions on Amazon Web Services and Microsoft Azure.
- Next Steps:
- Clean room administrators must sign up for the clean room environment and configure the associated Snowflake account before users can utilize the web app or developer APIs.
This introduction provides a comprehensive overview of Snowflake Data Clean Rooms, emphasizing their significance in facilitating secure and collaborative data analysis while prioritizing data privacy and security.
18. Performance Optimization
https://docs.snowflake.com/en/user-guide/performance-query-exploring
Benchmark Test Sequence
The test sequence was as follows:-
- Run from cold: Which meant starting a new virtual warehouse (with no local disk caching), and executing the query.
- Run from warm: Which meant disabling the result caching, and repeating the query. This makes use of the local disk caching, but not the result cache.
- Run from hot: Which again repeated the query, but with the result caching switched on.
Each query ran against 60Gb of data, although as Snowflake returns only the columns queried, and was able to automatically compress the data, the actual data transfers were around 12Gb. As Snowflake is a columnar data warehouse, it automatically returns the columns needed rather then the entire row to further help maximize query performance.
Performance Run from Cold
This query returned in around 20 seconds, and demonstrates it scanned around 12Gb of compressed data, with 0% from the local disk cache. This means it had no benefit from disk caching.

The bar chart above demonstrates around 50% of the time was spent on local or remote disk I/O, and only 2% on actually processing the data. Clearly any design changes we can do to reduce the disk I/O will help this query.
The results also demonstrate the queries were unable to perform any partition pruning which might improve query performance. We’ll cover the effect of partition pruning and clustering in the next article.
Run from Warm
This query was executed immediately after, but with the result cache disabled, and it completed in 1.2 seconds – around 16 times faster. In this case, the Local Disk cache (which is actually SSD on Amazon Web Services) was used to return results, and disk I/O is no longer a concern.

In the above case, the disk I/O has been reduced to around 11% of the total elapsed time, and 99% of the data came from the (local disk) cache. While querying 1.5 billion rows, this is clearly an excellent result.
Run from Hot
This query returned results in milliseconds, and involved re-executing the query, but with this time, the result cache enabled. Normally, this is the default situation, but it was disabled purely for testing purposes.

The above profile indicates the entire query was served directly from the result cache (taking around 2 milliseconds). Although not immediately obvious, many dashboard applications involve repeatedly refreshing a series of screens and dashboards by re-executing the SQL. In these cases, the results are returned in milliseconds.
Although more information is available in the Snowflake Documentation, a series of tests demonstrated the result cache will be reused unless the underlying data (or SQL query) has changed. As a series of additional tests demonstrated inserts, updates and deletes which don’t affect the underlying data are ignored, and the result cache is used, provided data in the micro-partitions remains unchanged.
Finally, results are normally retained for 24 hours, although the clock is reset every time the query is re-executed, up to a limit of 30 days, after which results query the remote disk.

Snowflake Performance Summary
The sequence of tests was designed purely to illustrate the effect of data caching on Snowflake. The tests included:-
- Raw Data: Including over 1.5 billion rows of TPC generated data, a total of over 60Gb of raw data
- Initial Query: Took 20 seconds to complete, and ran entirely from the remote disk. Quite impressive.
- Second Query: Was 16 times faster at 1.2 seconds and used the Local Disk (SSD) cache.
- Result Set Query: Returned results in 130 milliseconds from the result cache (intentially disabled on the prior query).
To put the above results in context, I repeatedly ran the same query on Oracle 11g production database server for a tier one investment bank and it took over 22 minutes to complete.
Finally, unlike Oracle where additional care and effort must be made to ensure correct partitioning, indexing, stats gathering and data compression, Snowflake caching is entirely automatic, and available by default. Absolutely no effort was made to tune either the queries or the underlying design, although there are a small number of options available, which I’ll discuss in the next article. Sign up below for further details.
System Performance Tuning Best Practice
Clearly data caching makes a massive difference to Snowflake query performance, but what can you do to ensure maintain the performance when you cannot change the cache?
Here’s a few best practice tips:-
- Auto-Suspend: By default, Snowflake will auto-suspend a virtual warehouse (the compute resources with the SSD cache after 10 minutes of idle time. Best practice? Leave this alone. Keep in mind, you should be trying to balance the cost of providing compute resources with fast query performance. To illustrate the point, consider these two extremes:
-
Suspend after 60 seconds: When the warehouse is re-started, it will (most likely) start with a clean cache, and will take a few queries to hold the relevant cached data in memory. (Note: Snowflake will to restore the same cluster, with the cache intact, but this is not guaranteed).
try
-
Suspend Never: And your cache will always be warm, but you will pay for compute resources, even if nobody is running any queries. However, provided you set up a script to shut down the server when not being used, it may make sense.
-
- Scale up for large data volumes: If you have a sequence of large queries to perform against massive (multi-terabyte) size data volumes, you can improve query performance by scaling up. Simple execute a SQL statement to increase the virtual warehouse size, and new queries will start on the larger (faster) cluster. While this will start with a clean (empty) cache, you should normally find performance doubles at each size, and this extra performance boost will more than out-weigh the cost of refreshing the cache.
- Scale down - but not too soon: Once your large task has completed, you could reduce costs by scaling down or even suspending the virtual warehouse. Be aware again however, the cache will start again clean on the smaller cluster. By all means tune the warehouse size dynamically, but don’t keep adjusting it, or you’ll lose the benefit.
19. Analyzing Queries Using Query Profile
Introduction
- Query Profile provides execution details and statistics for a query.
- It offers a graphical representation of the processing plan and statistics for each component.
- Helps in understanding query performance and identifying improvement opportunities.
When to Use Query Profile
- Useful whenever deeper insights into query performance or behavior are needed.
- Helps in spotting mistakes, identifying bottlenecks, and optimizing queries.
How to Access Query Profile
- Accessed from the detail page for a query in the Classic Console.
- Available in the Worksheets and History tabs.
Query Profile Interface
- Steps: Shows processing steps, toggle between each step if multiple.
- Operator tree: Graphical representation of operator nodes and their relationships.
- Node list: Collapsible list of operator nodes by execution time.
- Overview: Displays an overview of the query profile, changes to operator details when a node is selected.
Steps
- Queries processed in multiple steps, displayed in separate panels.
- Can switch between panels to view each step’s details.
This tool seems really handy for understanding the inner workings of queries and optimizing their performance.
Operator Tree
The operator tree offers a visual representation of the operator nodes within a query and the connections between them:
- Operators: Functional components responsible for various data management and processing tasks.
- Attributes:
- Type [#]: Operator type and ID number for unique identification.
- Percentage: Proportion of time consumed by the operator within the query step.
- Label: Additional information specific to each operator.
- Links: Represent data flow between operator nodes, showing the number of processed records.
Note
-
If the operator tree is not displayed, touch screen events interface might interfere. Temporary disabling might be required for proper functionality.
For further reading, please do read documentation, it’s better
Analyzing Queries Using Query Profile | Snowflake Documentation
Query Profile, available through the Classic Console, provides execution details for a query.
https://docs.snowflake.com/en/user-guide/ui-query-profile#query-profile-interface
20. Snowpipe
Overview:
Snowpipe is a feature in Snowflake that facilitates the loading of data from files in a continuous and automated manner. It allows data to be loaded from files in micro-batches as soon as they become available in a specified stage, providing near-real-time data availability for users.
How Snowpipe Works:
- Snowpipe loads data from files immediately upon their availability in a designated stage.
- It operates based on a defined COPY statement contained within a pipe object.
- A pipe is a named Snowflake object that contains the necessary instructions for loading data.
- The COPY statement within the pipe specifies the source location of data files (i.e., a stage) and the target table for loading.
- Snowpipe employs different mechanisms for detecting staged files:
- Automated Snowpipe using cloud messaging: Utilizes event notifications from cloud storage to inform Snowpipe of new data files.
- Snowpipe REST endpoints: Client applications call Snowpipe REST endpoints with the pipe name and data filenames for loading.
Supported Cloud Storage Services:
- Snowflake supports automated Snowpipe and Snowpipe REST API calls for various cloud storage services, including Amazon S3, Google Cloud Storage, Microsoft Azure Blob storage, Microsoft Data Lake Storage Gen2, and Microsoft Azure General-purpose v2.
Differences from Bulk Data Loading:
- Authentication:
- Bulk data load: Relies on client-supported security options for authentication.
- Snowpipe: Requires key pair authentication with JSON Web Token (JWT) when calling REST endpoints.
- Load History:
- Bulk data load: Load history stored in table metadata for 64 days.
- Snowpipe: Load history stored in pipe metadata for 14 days and must be requested via Snowflake.
- Transactions:
- Bulk data load: Always performed in a single transaction.
- Snowpipe: Loads combined or split into single or multiple transactions based on file sizes and settings.
- Compute Resources:
- Bulk data load: Requires user-specified warehouses.
- Snowpipe: Utilizes Snowflake-supplied compute resources.
- Cost:
- Bulk data load: Billed for virtual warehouse usage.
- Snowpipe: Billed according to compute resources used during data loading.
Recommendations:
- Snowflake recommends following file sizing best practices and staging files once per minute for efficient and cost-effective Snowpipe loads.
- It’s advised to load data from a specific set of files using either bulk data loading or Snowpipe but not both to avoid data duplication.
Pipe Security:
- Access control privileges are required for creating, owning, and managing pipes, as well as pausing or resuming them.
- Special DDL commands like CREATE PIPE, ALTER PIPE, DROP PIPE, DESCRIBE PIPE, and SHOW PIPES are provided for managing pipes.
Snowpipe DDL:
- Snowflake provides a set of special DDL commands for creating and managing pipes, along with standard access control DDL for managing access to necessary database objects for Snowpipe.
Conclusion:
Snowpipe streamlines and automates the data loading process in Snowflake, enabling near-real-time data availability for users. It offers advantages over traditional bulk data loading methods in terms of speed, efficiency, and cost-effectiveness. By following best practices and leveraging its features, organizations can optimize data loading workflows and enhance their data-driven decision-making capabilities.